Sell More Catering: AI-Styled Platters, Packages, and Setups
Why catering visuals matter for sales (and what they cost you today)
Picture this: Monday morning, an office manager needs lunch for 60 people by Thursday. She has 8 tabs open and 15 minutes before her next meeting. She won’t read a paragraph about “assorted sandwiches.” She wants to see a 60-person platter spread, portion scale, and a price she can forward to finance. If your catering page is text-only or shows single-plate photos, you’re invisible in that 15-minute window.
Two realistic comparisons using AI catering photography we’ve seen teams replicate:
- A sandwich shop ran a two-week A/B test (hypothetical but reasonable). They compared text-only pricing vs. package cards with AI-styled platter shots. Package cards generated 28% more quote requests (19 vs. 15 per week) and 14% higher average order value by surfacing add-ons (chips, drinks) visually.
- A Mediterranean concept swapped one hero plate for a full buffet image featuring proteins, salads, and warm sides. Over four weeks, inquiry-to-order conversion improved from 32% to 41% (hypothetical), largely because buyers could estimate portioning at a glance.
Opportunity cost is real. Traditional photography for a full catering line (20 items + 3 setups) can run $3,000-$6,000 and take 2-4 weeks-long enough to miss seasonal corporate budgets. With AI-styled images, you can build a complete packages gallery in an afternoon, then upgrade the winning images later. That speed matters when a facilities admin needs proof-today-that your “serves 20” tray actually looks like it feeds 20. Show scale, variety, and package clarity, and you’ll turn skim-readers into booked events.
Summary: Buyers evaluate catering in minutes. Show scale and variety with AI-styled package images to capture more inquiries and higher AOV without multi-week shoots.
Why current approaches fail for platters, buffets, and packages
Traditional approaches struggle specifically with bulk platters and buffets because the visuals must communicate quantity, layout, and variety-not just a pretty plate.
Where teams get stuck with AI catering photography:
- Traditional photoshoots
- Logistics: Coordinating a photographer, stylist, props, and enough product to build a 40-person buffet takes at least 1-2 weeks. Editing adds another week. You need 3 distinct setups (corporate lunch, private brunch, evening reception). That means booking multiple sessions.
- Cost: A typical 20-dish shoot costs $3,000-$6,000 including stylist fees and post-fine for a rebrand, not for quarterly menu tweaks or one-off holiday packages.
- Stock photography
- Mismatch risk: A stock “sandwich platter for 20” might show bread types or garnishes you don’t use. That leads to refund requests: “The photo had grapes and artisan rolls; we got sliced wheat and chips.” For catering, authenticity matters because orders are large and buyers expect exactly what they saw.
- Brand dilution: Competitors can use the same image, so your “signature buffet” looks identical across town.
- DIY phone photos
- Inconsistency: Different lighting and props per day. Your platter gallery ends up with five looks for five items, which confuses buyers.
- Space constraints: Ghost kitchens often don’t have room for a staged buffet. You end up with a cramped prep-table shot-accurate but unappealing.
Example pitfalls:
- A taco ghost kitchen needed a 60-person “Taco Bar” photo but lacked chafers and tables. A phone shot of six pans on a speed rack didn’t inspire confidence.
- An agency mocked up a holiday buffet using stock. The client got complaints when the real setup didn’t match the imagery. They pulled the page mid-season, losing prime revenue weeks.
Summary: Traditional shoots are slow and costly; stock is inauthentic; DIY is inconsistent. None reliably communicates scale and variety for platters and buffets.
How to style platters, buffets, and packages with Yummify
Here’s a practical workflow to style bulk platter images, buffet setups, and event packages-then turn those visuals into pricing cards and a working inquiry funnel.
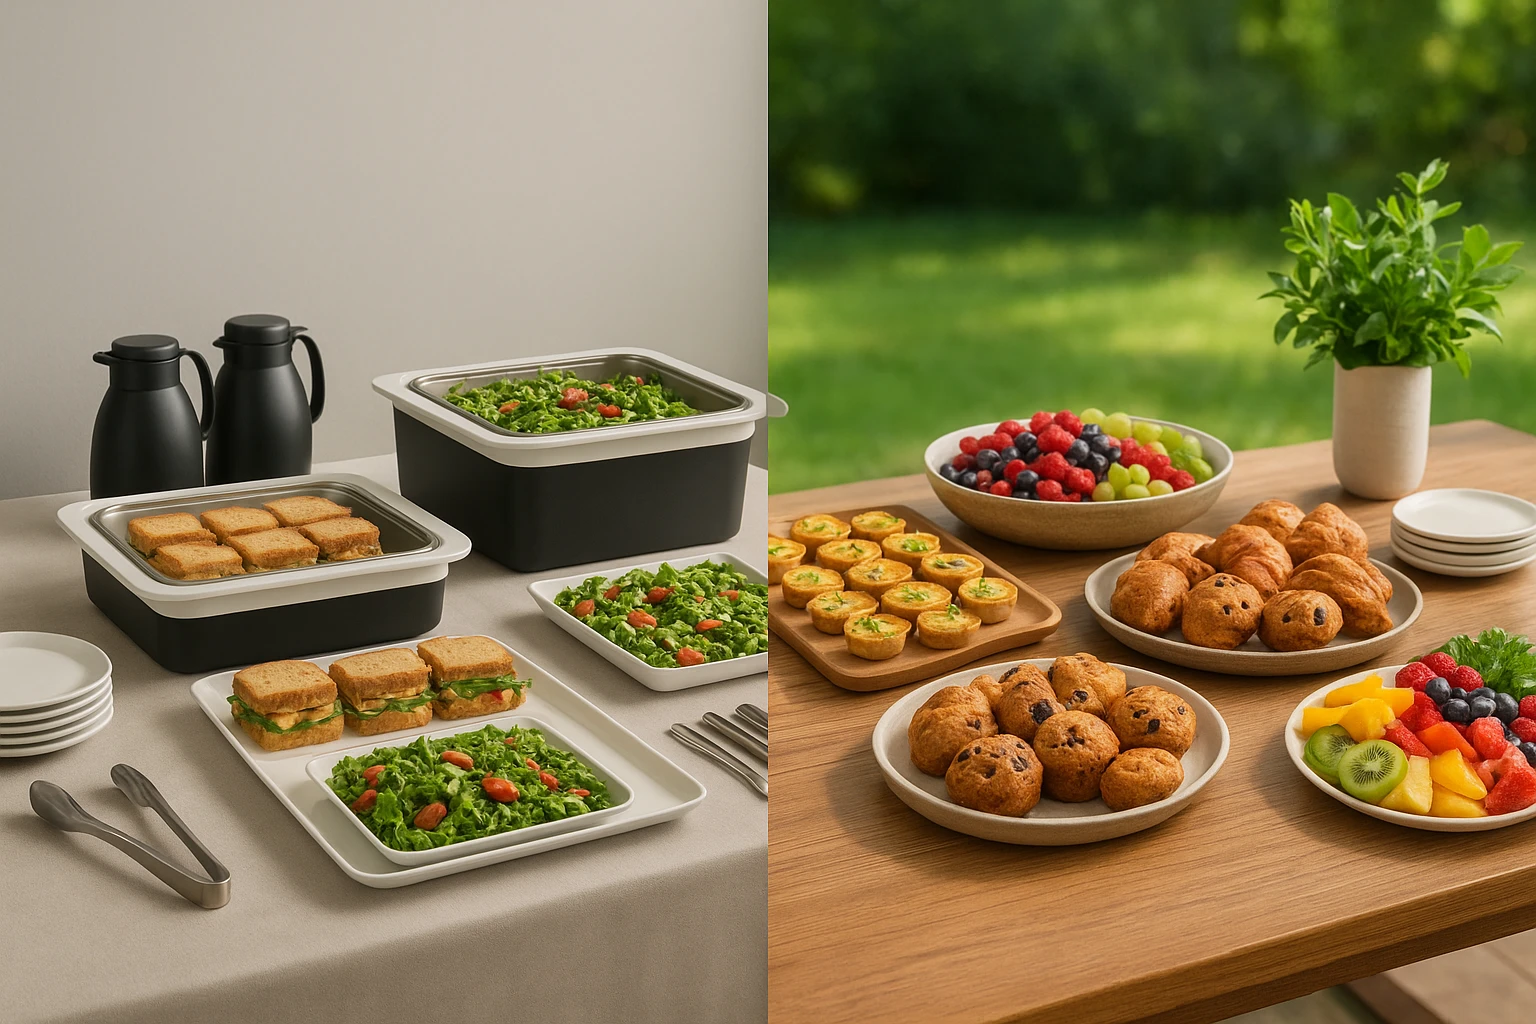
Step 1: Create branded environments (3 presets)
- Corporate Boardroom Buffet: neutral linens, black/white chafers, clean lines, cool daylight. Purpose: buffet setup photography for office orders for 20-100. This AI catering photography approach works well for corporate clients.
- Backyard Brunch (Private): warm wood, soft morning light, greenery; purpose: birthdays, showers, graduations (10-40).
- Minimal Menu Card: light neutral tabletop, top-down, no props; purpose: pricing card thumbnails and grids.
Step 2: Input source
- Upload quick reference photos of your actual trays (phone is fine with daylight). Or enter a text prompt (e.g., “Three aluminum trays: lemon chicken, roasted veg, turmeric rice; parsley garnish; serves 20”). Yummify validates it’s food and styles based on your environment preset.
Step 3: Generate variations that signal scale
- Angle: top-down for pricing cards; 3/4 wide for full buffet tables.
- Density: low vs. high fill. For example, a 60-person sandwich spread should show multiple platters and beverage carafes to communicate volume.
- Portions: include serving utensils and repeated trays to imply guest count.
Step 4: Build catering pricing cards (text outside the image)
- Template fields: Package name, serves range (e.g., 18-22), per-person or flat price, inclusions, lead time, add-ons. These cards are essential for any AI catering photography workflow.
- Example (Corporate): “Classic Sandwich Package - Serves 20 - $179 flat. Includes: 40 sandwich halves, chips, 20 cookies. Add drinks: +$2.50/person. 24h notice.”
- Example (Private): “Brunch Spread - Serves 12 - $228. Mini quiches, fruit tray, pastries; add mimosa kit +$36.”
Step 5: Wire a 2-step inquiry funnel
- On-package CTA: “Get a fast quote.” Step 1 (short): date, headcount, company/private, package(s) interested. Step 2 (optional): dietary notes, delivery window. This creates an effective catering inquiry funnel that converts.
- A/B test: two hero images (corporate vs. private), two CTA copies (“Get a fast quote” vs. “Check availability”). Keep images standard quality to test; upgrade winners for final use.
Two quick wins:
- A 40-person taco bar gallery tile with visible duplicate trays and tortillas stack often outperforms a single-pan shot. The improvement is typically 20-30% more clicks (hypothetical but consistent with buyer logic).
- A “Minimal Menu Card” crop increases mobile scannability. We’ve seen teams cut bounce on pricing grids by several points when thumbnails are top-down and text sits outside the image.
Summary: Use Yummify environments to create corporate, private, and minimal looks. Generate scale-signaling images, attach pricing cards, and plug a 2-step inquiry funnel.

Case study (hypothetical, realistic): From text-only to booked-out Fridays
To illustrate the full workflow, here’s a realistic hypothetical example for “BrightBites Sandwich Co.”
Scope and timeline
- Goal: launch a catering gallery with 12 platters, 3 buffet setups, and 6 package cards in 48 hours.
- Day 1 morning: capture quick tray references (phone by a window). Afternoon: create 3 branded environments in Yummify and generate 72 images (6 per item) at standard quality.
- Day 2 morning: review metrics from a pilot page sent to an email list; select 18 winners; upgrade 10 images for hero/OG use.
Costs (hypothetical credit math)
- 72 standard generations at an estimated $4/ea equivalent in credits = $288.
- 10 high-quality upgrades at an estimated $8/ea = $80.
- Total imagery outlay ? $368 versus a $3,000-$6,000 traditional shoot, delivered in 2 days instead of 2-4 weeks.
Performance (four-week window, hypothetical but plausible)
- Inquiries/week: 12 -> 19 (+58%).
- Inquiry-to-order conversion: 34% -> 42% after switching hero to a 3/4 buffet shot and simplifying the form to 2 steps.
- AOV: $265 -> $306 (+15%) by visualizing add-ons (drinks +$2.50/person; dessert platter +$35).
What changed the most?
- Scale signaling: The “Serves 40 Sandwich Spread” showed three platters, stacks of compostable plates, and tongs-clearer than a single platter.
- Package clarity: Pricing cards with “Serves 18-22” reduced back-and-forth emails about portions. This AI catering photography approach made portion visualization immediate.
- Segmentation: The AI catering photography results showed two hero variations (corporate boardroom vs. backyard brunch). This AI catering photography strategy revealed that corporate traffic converted 1.3x better on weekdays; private party traffic preferred the warmer scene Friday-Sunday. Corporate traffic converted 1.3x better on weekdays; private party traffic preferred the warmer scene Friday-Sunday. Swapping the hero by daypart lifted total quotes by ~12% (hypothetical).
Summary: In 48 hours, a full catering gallery and funnel produced more weekly inquiries and a higher AOV. This came at a fraction of traditional shoot costs (hypothetical but realistic).
Implementation checklist: 10 steps + common mistakes to avoid
Follow this step-by-step plan and you’ll have a working, testable catering page in a day or two.
Checklist
- List your top-selling formats: 8-12 items (e.g., 20-sandwich platter, 12-person brunch, taco bar for 40).
- Define three environments: Corporate Boardroom, Backyard Brunch, Minimal Menu Card.
- Capture references: phone photos near a window; 3 angles per tray (top-down, 45?, close detail). If you’re missing an item, use a text prompt.
- Generate images in Yummify: 4-6 variations per item per environment at standard quality.
- Select winners: prioritize shots that clearly show duplicate trays, utensils, and beverage volume to imply guest count.
- Upgrade the 10-15 images you’ll use for hero, section headers, and package tiles.
- Build pricing cards (text, not baked into images): name, serves, flat or per-person price, inclusions, lead time, add-ons. Example corporate card: “Hot Entree Buffet - Serves 25 - $15.50/person. Chicken or tofu, rice, salad, rolls. 48h notice.” Example private card: “Backyard Taco Set - Serves 16 - $198. Proteins x2, tortillas, salsas, chips.”
- Wire the inquiry funnel: 2-step form, optional dietary notes. Place CTAs next to every package tile and again at the top (/#hero) and mid-page. Every AI catering photography project should include this step.
- A/B tests (2 weeks): hero image (corporate vs. private look), CTA copy (“Get a fast quote” vs. “Check availability”), grid style (top-down minimal vs. lifestyle buffet).
- Measure and iterate: track inquiries, conversion, and AOV. Replace underperforming images with new variations.
Common mistakes
- Props overshadow food: skip wine bottles for corporate scenes; keep it workplace-appropriate.
- Inconsistent environments: don’t mix warm rustic with cool modern on the same page.
- Text embedded in images: hurts mobile legibility and makes updates harder. Keep text in your CMS.
- Skipping quality upgrades: upgrade only the images that drive clicks or conversions; don’t waste credits on everything.
Summary: Use a 10-step plan to generate, select, and deploy images, build pricing cards, and wire a 2-step funnel-while avoiding the most common traps.
Next steps
Spin up three catering looks today: Corporate Boardroom, Backyard Brunch, and Minimal Menu Card. Generate 4-6 variations per package at standard quality, wire a 2-step “Get a fast quote” form, then upgrade only the hero and winning tiles. You’ll have a credible catering page by tomorrow, without staging a single buffet. Head to pricing to pick a plan that matches your volume. Try Yummify free Start with your top 8-12 items and fill the calendar while competitors wait on a photoshoot.
FAQ
Can I use my own tray photos, or do I have to start from text prompts?
You can do either. If you have trays on hand, snap phone photos near a window. Yummify validates that the image is food and styles it based on your branded environment. If you’re missing an item (e.g., seasonal holiday platter), generate from a text prompt describing the dish and serving size. Many teams mix both methods to cover their full catering line.
How accurate are portion sizes in AI-styled images?
Images communicate scale, not an exact gram count. Use visual cues like duplicate trays, serving utensils, and stacks of plates to imply guest count, then state “Serves 18-22” in the pricing card. For items where portion precision matters (e.g., sliders per person), include the count in text. When in doubt, add a short note: “Photos are representative; quantities listed in package details.”
Do I need studio lights or props for good results?
No. For reference photos, natural daylight is enough. Yummify’s branded environments handle lighting and background styling, so you don’t need chafers, linens, or decor on-site. If you want a particular look (e.g., wood boards for private events), define it once in your environment and reuse it across all items for consistency.
How does this compare to hiring a photographer for catering packages?
A traditional shoot for 20 items plus buffet setups can cost $3,000-$6,000 and take 2-4 weeks. With Yummify, you can generate dozens of styled images in hours, test which ones drive quote requests, and upgrade only the winners to high quality. Many teams still book a quarterly pro shoot for one or two hero shots, and use AI for everything high-volume or time-sensitive.
What if my food doesn’t photograph well on a prep table?
That’s common for ghost kitchens and tight spaces. Use simple reference shots for accuracy, then rely on your branded environments to produce the polished visuals. If a dish consistently looks flat in reference, try generating from a text prompt that emphasizes textures and garnishes (e.g., “glossy roasted vegetables, fresh parsley, slight steam”).
How long does it take to learn and build a full catering page?
Plan one afternoon for setup: create three environments and generate initial images for 8-12 items. Most teams can publish a credible page the next day, then run two weeks of simple A/B tests on hero images and CTA copy. The workflow is repeatable-seasonal packages can be added in under an hour once your environments are set.
Can agencies manage multiple clients’ catering visuals with Yummify?
Yes. Create a separate branded environment per client (e.g., “Acme Tacos-Corporate,” “Acme Tacos-Private”) to keep looks consistent within each brand and speed approvals. Agencies typically generate 3-5 variations per package, present a contact sheet, then upgrade only the client’s final selections to high resolution.
Related posts

15 Creative Food Photography Ideas to Make Your Dishes Stand Out
Discover creative food photography ideas to make your dishes stand out. Learn action shots, deconstructed dishes, unique angles, storytelling, and AI tools for stunning food visuals.

Beyond Burgers: AI Food Styling for Diets and Cuisines
Use AI food styling to create accurate vegan, gluten-free, halal, kosher, and global cuisine photos that convert across delivery apps, QR menus, and social.

Close the Loop: Tie Food Imagery to Analytics and Sales
Stop guessing which food photos work. Learn a simple workflow to tie Yummify images to analytics, A/B test visuals, and promote only the photos that actually sell.