AI Photography for Cloud and Ghost Kitchens
Introduction: Your storefront is a thumbnail
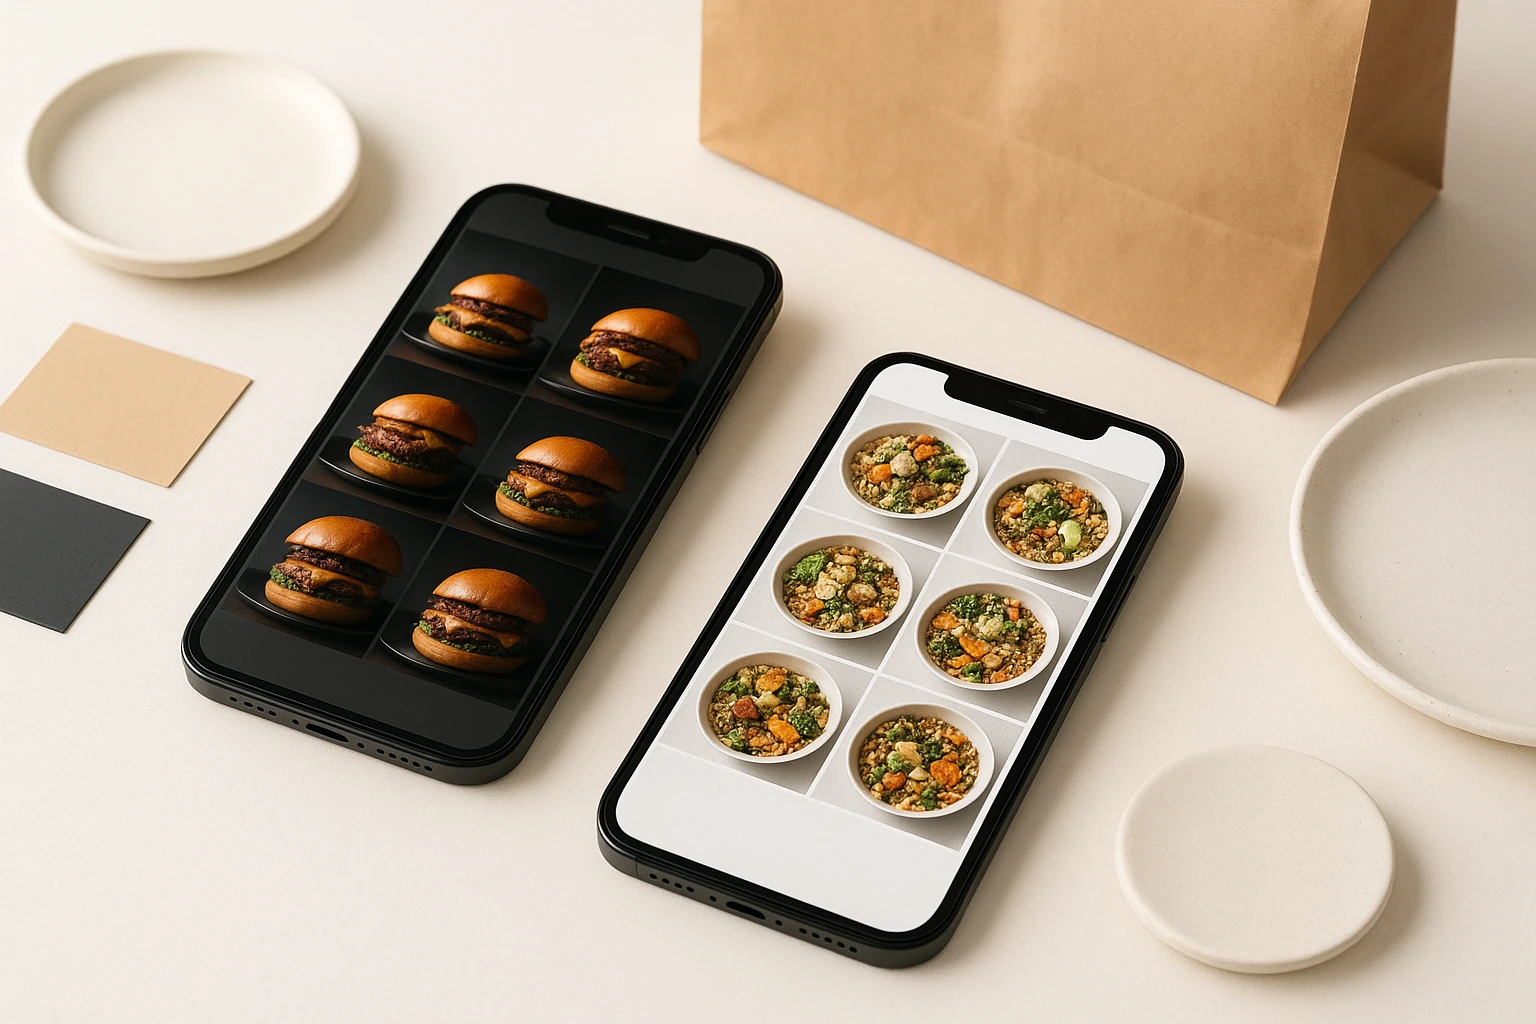
Picture this: you’re launching a ghost restaurant for ghost restaurant marketing with two wings-“Midnight Smash” for late-night burgers and “Garden Grain” for bowls. There’s no dining room, no neon sign, no mural. On Uber Eats, your first impression is a 1:1 hero image and a scroll of dish thumbnails. In week one, your burger gets posted with a moody black background while your fries sit on a bright white tabletop. The salad brand borrows a stock photo that looks nothing like your recipe. Conversion sputters.
This is the delivery-only reality: AI food photography imagery is the brand. The photo isn’t decoration-it’s the promise of heat, texture, and portion size. Consistency is not about aesthetics for aesthetics’ sake; it’s how strangers recognize your food across platforms and cities. A uniform look tells customers, “This is the same brand I liked yesterday.”
Without a physical space, virtual brands need a visual space for cloud kitchen branding. That’s what consistent AI imagery provides. With Yummify, you save your visual rules once (lighting, surfaces, color temperature, styling) as a reusable branded environment. Apply it to every dish-whether you start from an iPhone snap or a text prompt. Instead of scheduling a shoot, you generate in minutes, test variations, and ship the best performer the same day. In other words, you stop waiting on a studio you don’t have and build trust with the only canvas you do: the menu image.
Summary: Delivery-only brands win or lose on menu images. Consistent AI imagery becomes the brand’s “space,” replacing decor and signage with reliable visual language customers learn to trust.

Why visual consistency matters more for delivery-only brands
No dining room means your hero photo does triple duty: it’s your signage, your ambiance, and your packaging. On delivery apps, customers make 1-2 second decisions while scrolling. Two mismatched photos send two conflicting messages about quality and portion size, and hesitation kills clicks.
Concrete impact (hypothetical but realistic): a wings brand averages 200 impressions/day per item on DoorDash. At a 13% click-to-order rate and $18 average order value, that’s ~26 orders/day ($468). Tighten visuals with a consistent look (same lighting, plateware, and color cast) and push conversion to 17%. That’s ~34 orders/day ($612)-an extra $144/day or ~$4,320/month per item. The mechanism isn’t magic: uniform cues reduce cognitive friction. Customers recognize the brand and feel safer ordering quickly.
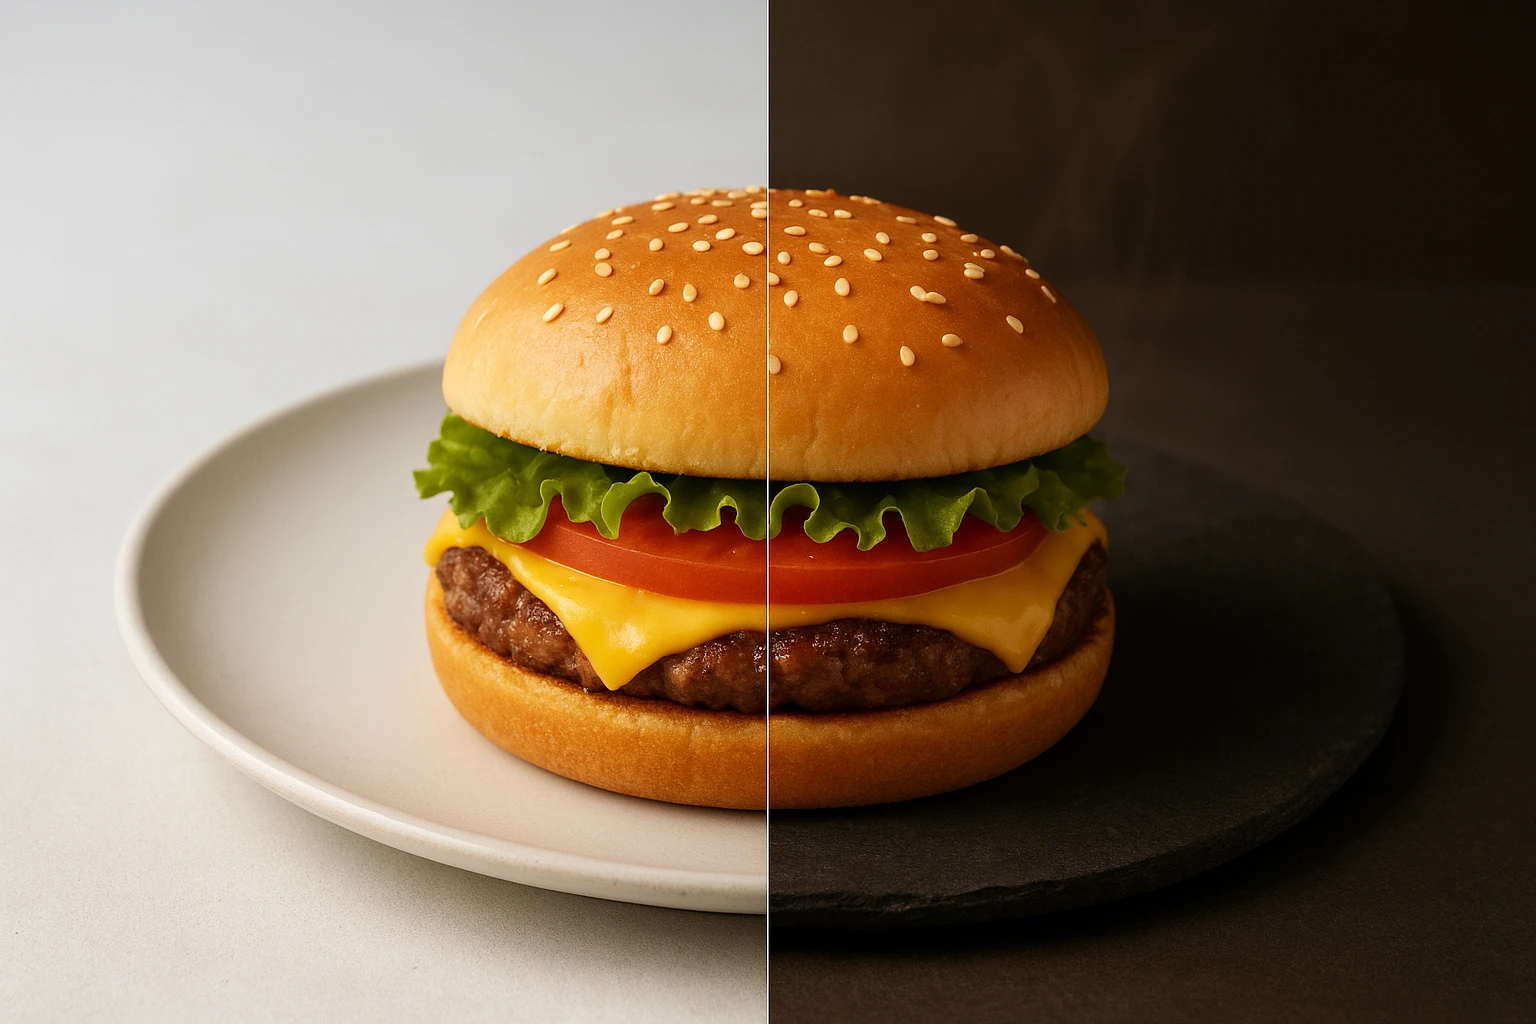
Second example: a ghost pizza concept sees mixed white-balance across listings (some images yellow, others blue). Customer reviews mention “looks different than photo.” Switching to a single branded environment-matte charcoal surface, warm 3200K lighting, oregano scatter-drops refund requests from 3.2% to 2.1% over 30 days (hypothetical), saving ~$220 on comps for every 1,000 orders.
Cloud kitchen branding consistency also plays nice with app ranking. Better click-through and fewer refunds signal quality to platforms, which can improve placement. You don’t control the algorithm, but you can control the inputs: style, color, framing, and how reliably those show up every time.
Summary: In delivery, small visual improvements compound. Consistent images reduce friction, increase recognition, and can yield meaningful gains in orders and fewer refunds.
Why typical solutions fall short for virtual brands
Traditional photography assumes a physical space and time. A 20-dish shoot typically costs $3,000-$6,000, requires a stylist ($400-$800), and takes 2-4 weeks end-to-end. That’s fine for quarterly hero shots, not for weekly menu tests. Delivery-only brands need virtual brand identity speed, volume, and precise consistency.
- Studio logistics: Ghost kitchens often operate out of shared facilities. Booking a studio adds $300/day and transport time. If you run two virtual brands across four cities, replicating the exact setup is nearly impossible.
- A/B testing: Most marketers want 3-5 variations per dish (close-up hero, ingredient sprinkle, cross-section, dark vs bright). For a 30-item menu at 3 variations each, that’s 90 images. At $150/dish minimum, you’re looking at $13,500 just to test.
DIY iPhone shoots are faster but introduce new problems:
- Inconsistency: Different staff, different days, different lighting. A taco taken at 10 a.m. by the window won’t match a burrito shot at 8 p.m. under fluorescents.
- Editing bottlenecks: Even a light mobile-edit workflow is ~30 minutes per photo. Ninety photos is 45 hours-more than a full work week-before you’ve uploaded anything.
Stock images are the quickest option but break trust when the delivered item looks nothing like the listing. Worse, your competitor might use the same photo. For virtual brands that live entirely online, these cloud kitchen branding approaches either won’t scale or erode authenticity.
Summary: Shoots are slow and expensive, DIY is inconsistent, and stock breaks trust. None provide the speed, volume, and uniformity delivery-only brands require.
How Yummify creates a consistent brand without a dining room
Yummify gives delivery-only brands a way to define their cloud kitchen branding “visual space” once and apply it everywhere. Here’s the workflow ghost kitchens and cloud concepts use. Move fast without sacrificing identity:
- Create a branded environment: Save your lighting temperature, background material, plateware style, and overall mood. Example: “Rustic Cantina”-terracotta tile, warm 3200K, lime wedges; or “Street Food Modern”-concrete slab, cool 4500K, stainless accents. This becomes your reusable style preset.
- Add dishes by photo or text: Upload an iPhone snap (Yummify validates it’s food) or start from a text description. The system’s prompt enhancement expands “smash burger with pickles” into a production-ready brief. It includes details like bun sheen, melted cheese pull, and sesame seed detail. You don’t need to learn prompt engineering.
- Generate and iterate in minutes: Spin up 3-5 variations for each item (tight macro, top-down, hand-cut fries in frame). Swap the same environment across items, so the look stays locked.
- Upgrade only the winners: Start at standard quality for speed. Once an image proves it performs, upgrade that exact image to higher resolution for marketplaces or print. This keeps costs aligned with performance.
Hypothetical example: a 24-item menu produces 72 standard images (3 variations each) in one afternoon. Compare that to a two-day studio shoot plus a week of edits. The practical win is not just time; it’s brand reliability. You get identical angles, color casts, and surfaces across the board, which delivery customers read as quality and consistency.
Summary: Define your brand once with branded environments, generate multiple variations in minutes, and only upgrade the images that perform-fast, consistent, and controllable.
Implementation guide: Launch or refresh a delivery-only brand in 10 days
Here’s a practical cloud kitchen branding step-by-step plan you can copy.
Day 1-2: Define your brand’s visual DNA
- Pick 1-2 background surfaces (e.g., charcoal slate; warm wood), 1 plate color, and a lighting temperature (e.g., warm 3200K for comfort foods).
- Choose 2-3 angles to repeat (e.g., top-down for bowls, 45? for burgers). Document this in a 1-page style sheet.
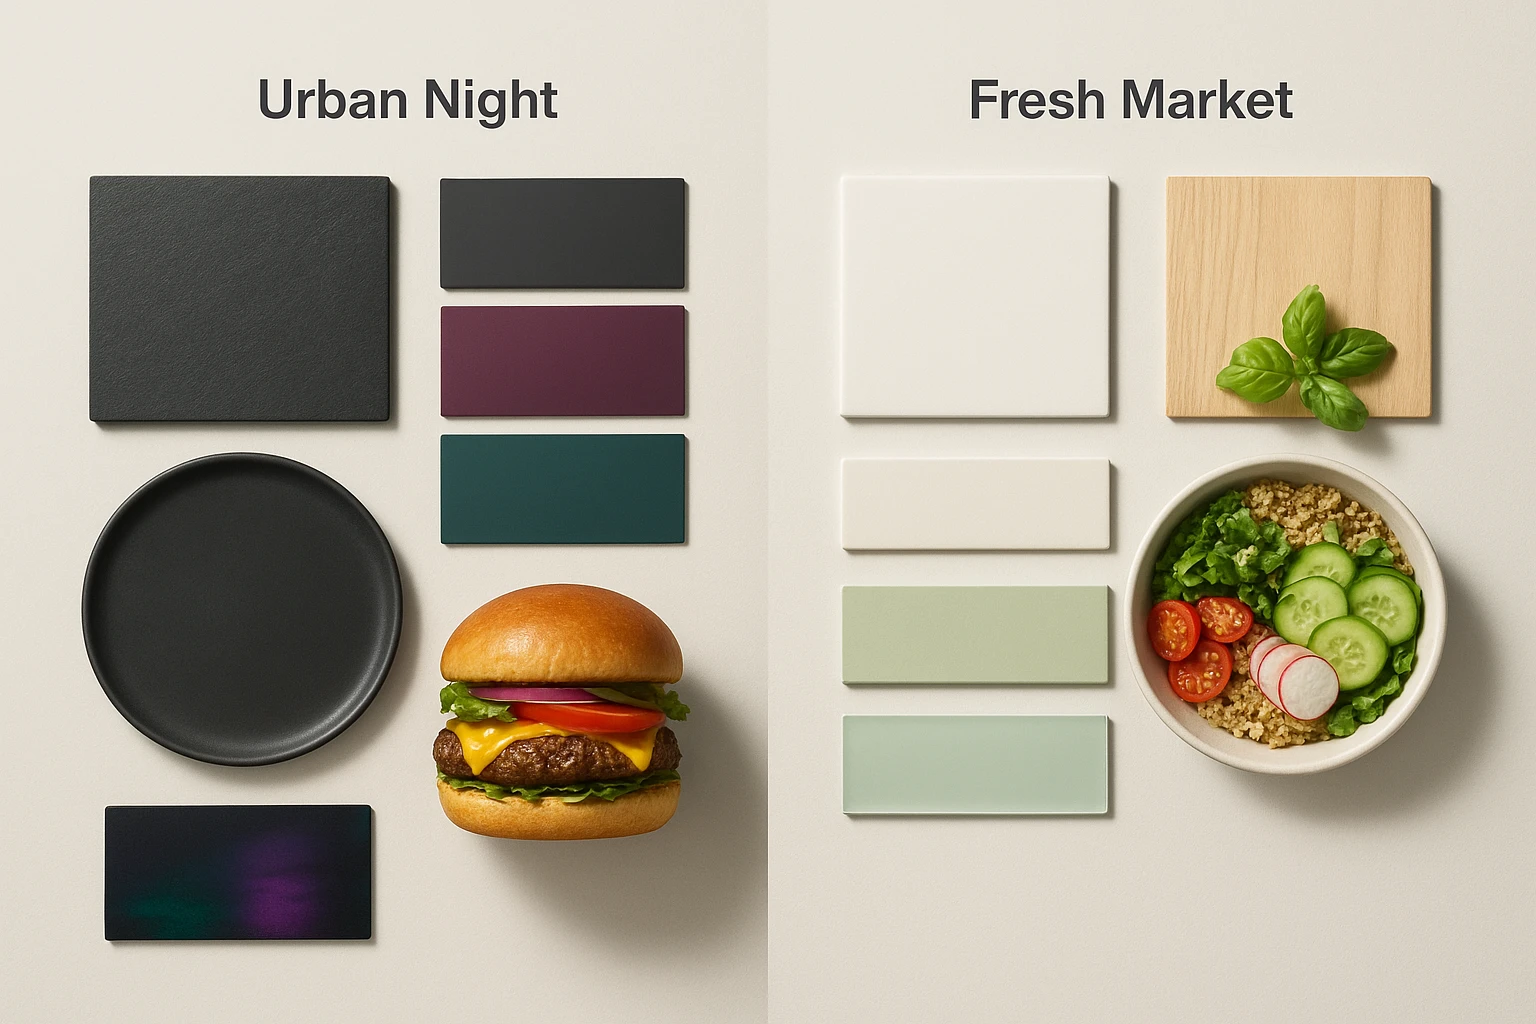
Day 3-4: Build 2-3 branded environments in Yummify
- Example environments: “Urban Night” for burgers (dark slate, neon reflections). Another is “Fresh Market” for bowls (white ceramic, daylight greens).
- Save them so every image you generate auto-matches.
Day 5-6: Generate your menu images
- Create 3 variations per item (macro, context with sides, clean hero). For 20 items, that’s 60 images in ~2-3 hours.
- Use prompt enhancement to standardize details (consistent garnishes, plate size).
Day 7: Pick winners and upgrade
- Review performance proxies: clarity at thumbnail sizes, readable portion cues. Upgrade 1-2 images per item to high resolution.
Day 8-10: Deploy and test
- Upload to Uber Eats/DoorDash. A/B test by swapping one variable at a time (angle or background). Run each variant for 7 days.
Common pitfalls to avoid
- Mixing styles across categories (e.g., bright bowls with moody burgers) confuses brand perception.
- Over-styling beyond what you serve leads to refunds. Match toppings and portion realistically.
- Forgetting marketplace crops: keep main subject centered and large so it survives 1:1 thumbnails.
Summary: A 10-day plan any ghost kitchen can follow. Define rules, build environments, generate variations, upgrade winners, and run real A/B tests on delivery apps.
Next steps
If your brand lives on delivery apps, cloud kitchen branding makes your images your dining room. In the next hour, you can set up a reusable style that makes every item look like it belongs together. Try this: upload one best-selling dish, create a branded environment that matches your concept, generate three variations, and upgrade the winner. Then repeat for five menu items and publish to one marketplace. You’ll have a consistent visual system in a single afternoon-without booking a studio. Yummify’s credit-based plans scale from testing a few images to refreshing entire menus monthly, so you only invest when an image earns its keep.
Continue exploring:
FAQ
Can I use my own photos as a starting point?
Yes. Upload an iPhone or DSLR shot and Yummify validates that it’s food before processing. Good inputs help: shoot near a window, avoid harsh overhead light, and keep the subject centered. If you don’t have a decent photo, you can also generate from a text description and still apply your branded environment. Many ghost kitchens start with quick prep-line snaps and refine the best results.
How does this compare to hiring a photographer for a full menu?
Traditional shoots are ideal for quarterly hero campaigns but are slow and costly for ongoing menu testing. A 20-dish shoot commonly runs $3,000-$6,000 and takes 2-4 weeks. Yummify generates styled images in minutes, lets you test 3-5 variants per dish, and only upgrade the ones that perform. Many teams use both: AI for volume and speed, photographer for a few flagship images.
What if my food doesn’t photograph well or melts quickly?
You can work from text prompts to avoid racing the clock with ice cream, cheese pulls, or steam. Prompt enhancement adds realistic details (condensation, melt patterns, crumb texture) that hold up at thumbnail size. If you use a reference photo, shoot components separately and let the AI style the final composition. Keep portions honest to avoid mismatched expectations and refunds.
Do I need special equipment or a studio?
No. For reference photos, a recent smartphone near a window works. Clear the background, use a neutral plate, and avoid mixed lighting. Because you’re applying a branded environment, the system standardizes the background, lighting feel, and styling-so you don’t need a physical set. This is exactly why virtual brands can scale imagery without a dining room.
How long does it take to learn and set up?
Plan on 30-60 minutes to create your first branded environment and generate initial tests. Most teams can produce a 20-item menu with three variations per item in a single afternoon. The biggest time saver is reusing the same environment on every dish. After the first session, new items typically take just a few minutes each.
Will AI images look fake or inconsistent across locations?
Consistency comes from the branded environment. Define your lighting, surfaces, and angle rules once and reuse them, so a bowl generated in Phoenix matches one in Chicago. If you see artifacts, regenerate with the same environment or pick a different angle variant. Many customers find the results more reliable than mixed staff phone photos.
Are delivery apps okay with AI-generated food images?
Policies vary by platform and region, but most focus on accuracy-not the tool used. Keep images representative: use your real recipes, realistic portions, and avoid adding items you don’t include. If needed, label images as “serving suggestion.” The goal is to set expectations clearly so customers get what they see.
Related posts

15 Creative Food Photography Ideas to Make Your Dishes Stand Out
Discover creative food photography ideas to make your dishes stand out. Learn action shots, deconstructed dishes, unique angles, storytelling, and AI tools for stunning food visuals.

Beyond Burgers: AI Food Styling for Diets and Cuisines
Use AI food styling to create accurate vegan, gluten-free, halal, kosher, and global cuisine photos that convert across delivery apps, QR menus, and social.

Close the Loop: Tie Food Imagery to Analytics and Sales
Stop guessing which food photos work. Learn a simple workflow to tie Yummify images to analytics, A/B test visuals, and promote only the photos that actually sell.