Ethical AI Food Styling: Draw the Line, Keep It Honest

Introduction: Instagram promises vs. table reality
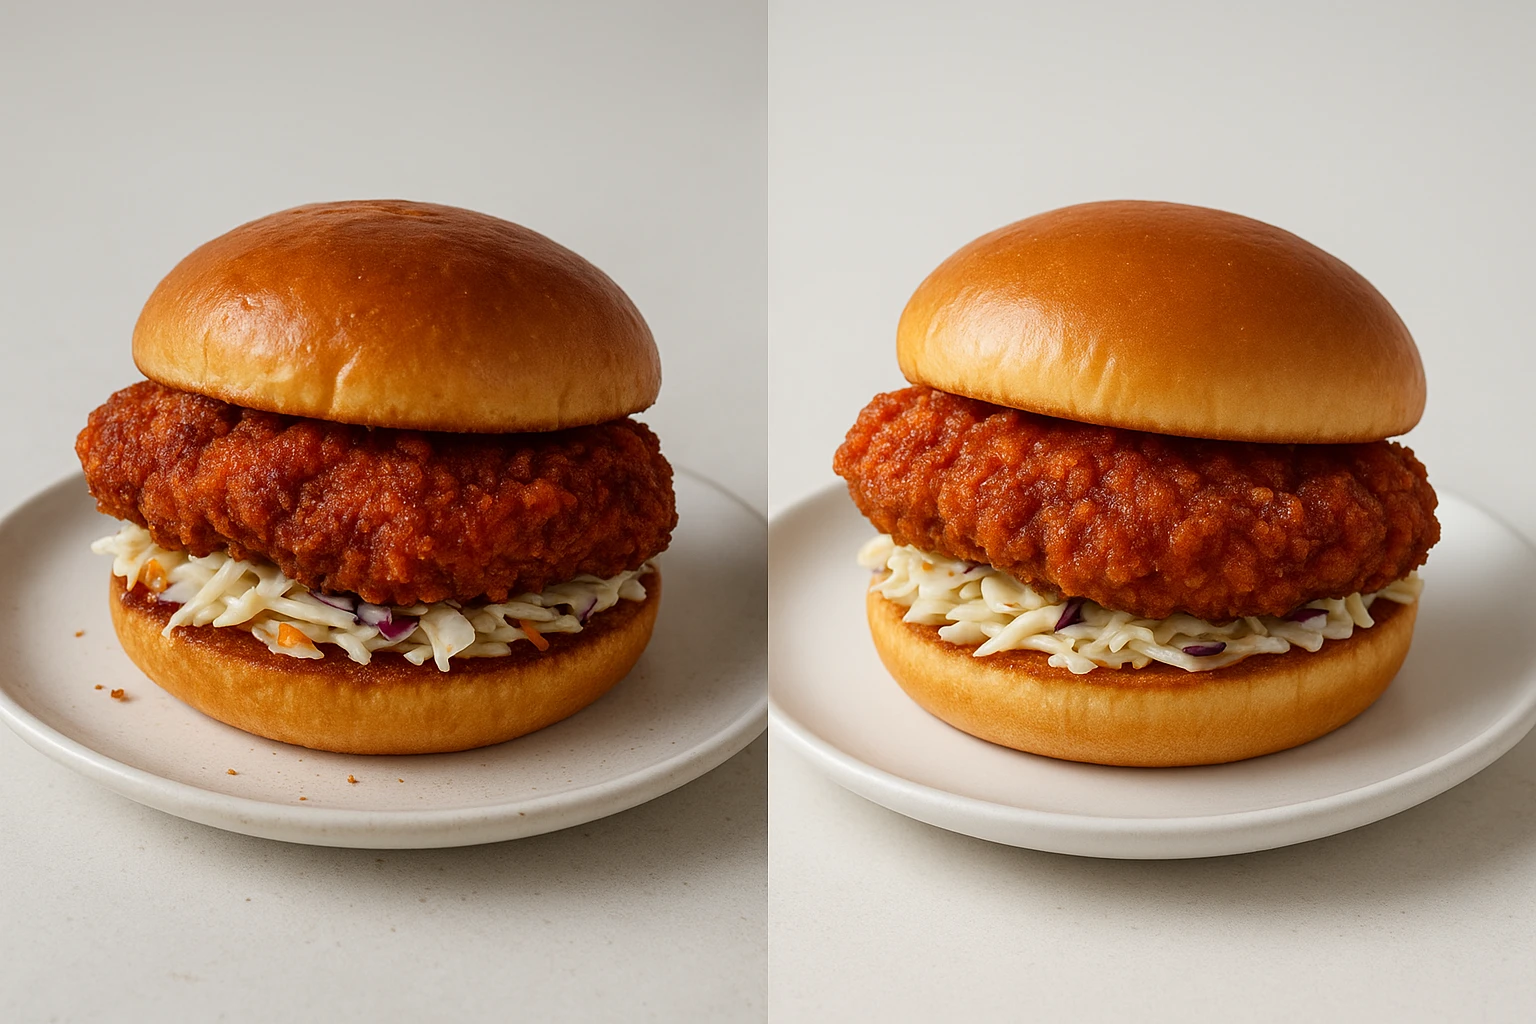
Picture this: a customer orders your Nashville hot chicken sandwich from delivery app images. The photo shows a glossy brioche bun, a crackly red crust, and a clean two-inch stack that looks gravity-proof. What shows up after a 14-minute ride? A solid sandwich-just not the one in the photo. The bun is flatter, the slaw is tucked inside, and there’s no cinematic steam halo. The customer feels misled, leaves a 2-star review, and asks for a refund.
That gap-Instagram vs. reality-isn’t solved by abandoning styling. It’s solved by setting honest boundaries on what styling can and can’t do. AI food styling ethics starts here. AI food photography can help when done responsibly. AI food imagery can absolutely help you produce consistent, affordable photos at speed. But if it crosses into fantasy-bigger portions, extra toppings you don’t serve, colors that don’t exist-you’ll pay in refunds, bad reviews, and skeptical customers.
In this article, we’ll draw the line between enhancement and misrepresentation and give you a concrete, step-by-step way to use Yummify to stay on the right side of that line. This AI food styling ethics framework protects both customers and your brand with ethical AI in marketing. You’ll see where teams get in trouble (stock photos, over-editing, careless prompting), how to implement guardrails, and how to update an entire menu in hours without misleading anyone. The goal: photos your kitchen can actually deliver, at a cost and speed your budget can handle.
Summary: Set up the core problem-unrealistic photos vs. real dishes-and preview a practical, ethical approach to AI styling with Yummify.
Why authenticity matters more than ever
The cost of crossing the line
If a typical order margin is $3 and you process 1,000 delivery orders a month, a 2% refund rate burns $60/month. Bump that to 5% when expectations are off, and you’re losing $150/month-$1,800/year-before you factor in lost repeat business. One independent burger spot we spoke with (hypothetical but realistic) saw refund comments use phrases like “doesn’t look like photo” in 40% of cases during a bad month. That’s an avoidable leak.
Conversion math you can act on
Accurate images don’t just avoid refunds-they help people choose more confidently when you follow AI food styling ethics. Example 1: a taco truck posts AI-styled photos that match actual fillings and tortilla size; item clicks increase 12% week-over-week while complaints stay flat. Example 2: a ramen shop shows honest broth color (amber, not neon) and true portion depth; add-to-cart rises 8% on DoorDash equivalents over two weeks, with zero complaints citing photo mismatch.
Why realism wins long term
- Reviews: One 1-star review deters 30-40 potential diners over its lifetime on high-traffic platforms (industry rule-of-thumb). Mismatched photos are a common trigger.
- Ops friction: Staff dealing with photo-based complaints can lose 15-30 minutes per shift responding to tickets.
- Brand memory: Customers remember “what I got vs. what I was shown.” Realistic photos set a reliable mental model, making reorders more likely.
Action to take this week: Audit your top 20% sellers. If any image shows ingredients, color saturation, or portion height your line can’t reproduce within 10%, flag it for replacement.
Summary: Authenticity reduces refunds, stabilizes reviews, and improves confident ordering. The math favors realistic images customers can rely on.
Where teams go wrong today (and why it backfires)
Pitfall 1: Stock photos that aren’t your food
A ghost kitchen grabs a stock burger shot: sesame-onion bun, double patty, thick-cut bacon. Their actual build is a single patty, regular sesame bun, and standard bacon. CTR spikes for a week, then refunds and 2-star reviews climb. Customers feel baited. The short-term lift creates long-term drag.
Pitfall 2: Over-editing or fantasy plating
A cafe over-saturates acai bowls until the purple glows. This violates AI food styling ethics and misleads customers. Another adds a towering granola sprinkle that kitchen staff can’t reproduce. Result: customers post side-by-sides on social with captions like “Expectations vs reality,” which can linger for months and harm local search reputations.
Pitfall 3: Unconstrained AI prompting
Without guardrails, it’s easy to prompt in ingredients you don’t actually serve. AI food styling ethics requires restraint and honesty. Example: adding truffle shavings to a mushroom pizza photo because it looks premium. Or exaggerating portion height by 30-40% for a noodles dish. Both are misrepresentations.
The compliance and trust risk
Most delivery marketplaces and review platforms expect that menu photos accurately reflect what’s delivered. Good AI food styling ethics aligns with these expectations. Even if you’re not violating a formal clause, you’re breaking the social contract with your buyers. A safer, smarter approach: use your real dish as the source, and lock prompts to what the kitchen can plate during a lunch rush-not just on a perfect day.
Action to take today: Ban stock photos for live menu items. Create a one-page “Do Not Do” list: no new ingredients, no portion inflation beyond 10%, no fake steam effects, no novelty props you don’t use in service.
Summary: Common shortcuts-stock photos, heavy edits, careless AI-inflate expectations and trigger refunds, bad reviews, and policy risk.

An ethical framework with Yummify
Draw the line: enhancement vs. misrepresentation
Acceptable enhancements within AI food styling ethics: lighting improvements, background swaps, minor color correction to match how the dish looks in good daylight, crumb cleanup, and plate/fork changes you actually use. Misrepresentation: adding ingredients not in the SKU, portion inflation beyond ~10%, removing visible allergens (e.g., nuts), faking impossible textures (cheese pulls two feet long), or changing core build (swapping ciabatta for brioche).
The Honest Images workflow in Yummify
- Start from your dish: Upload a real reference photo whenever possible. Yummify verifies it’s food before processing.
- Lock the look, not the recipe: Apply a Branded Environment (e.g., “Rustic Cantina” or “Bright Minimal”) to enforce consistent lighting and mood without changing the food itself.
- Describe what’s real: Use Prompt Enhancement, but feed details from your menu-exact toppings, bun type, sauce placement. Don’t add items you don’t serve.
- Generate standard-quality variations quickly. Pick 2-3 that match your line’s plating within 10%.
- Upgrade only winners to higher resolution for publishing.
- QA pass: Compare AI image vs. a fresh plate from the pass during a service window. If it doesn’t match on portion and build, regenerate.
Practical examples
- Mexican restaurant: Uses branded environments so every taco shot has warm terracotta tones while fillings remain accurate to the recipe.
- Ghost kitchen: No dining room? Use a neutral studio-style environment. If your bowl height averages 4 cm, don’t publish a 7 cm tower.
Action: Adopt a written rule: “If the line cook can’t plate it in 90 seconds, we don’t show it.” This simple AI food styling ethics rule prevents most misrepresentation issues.
Summary: Use Yummify’s features to enhance style while preserving truth: start from real dishes, apply brand environments, set red lines, and QA against the pass.
Case studies and an implementation guide
Case Study A: Seasonal Italian menu (realistic composite)
Scope: 14 dishes. By applying AI food styling ethics principles: Traditional path: $3,000-6,000, 2-4 weeks. With Yummify: 3 hours to capture iPhone references, 90 minutes to generate/select, same-day upload. Results after 30 days: online ordering conversion +9% for seasonal items; refund comments citing “photo mismatch” unchanged (0.6%)-a good sign. They used Branded Environment “Italian Rustic” and upgraded only 6 top images, saving ~70% vs. a full shoot.
Case Study B: Burger A/B test (hypothetical but realistic)
Three styles for the same double cheeseburger: (1) Bright & Bold, (2) Dark & Moody, (3) Minimal & Clean. All follow AI food styling ethics guidelines. All started from the actual burger photo. Over two weeks: Minimal & Clean wins with +12% add-to-cart vs. baseline; refund rate stays at 0.8%, and reviews mention “looks like the photo.” Cost: ~60 images generated at standard quality, 6 upgrades; spend < $250 vs. an estimated $3,000 shoot.
Implementation checklist you can run this week
- Inventory: List top 20 SKUs by sales; mark any misleading images.
- Create a 1-page Honest Image Charter: a) no new ingredients, b) <10% portion variance, c) true colors, d) no props you don’t use. Have chef, GM, and marketer sign it.
- Capture: iPhone, window light, 45? angle and top-down, steady surface. Two takes per dish.
- Generate: Build one Branded Environment; run 4-6 variations per dish at standard quality.
- QA: Compare to a fresh plate; if variance >10%, regenerate.
- Label: Add a short note: “Styled with AI from our actual dish.”
- Test: A/B on two items per week; upgrade only the winners.
Avoid these mistakes: adding aspirational garnishes, aggressive saturation, and shooting rare “perfect day” portions you can’t sustain during rush.
Summary: Two grounded case studies show speed and savings without misleading. A step-by-step checklist makes ethical AI styling repeatable.
Next steps
Run a 7-day Honest Image Sprint with Yummify. Pick your top 10 menu items, shoot quick iPhone references near a window, and create one Branded Environment that matches your vibe. Generate 4-6 standard-quality variations per dish, pick the most truthful options, and upgrade only the top 3 images. Add a simple label-“Styled with AI from our actual dish”-and A/B test against your current photos for two weeks. If mismatch complaints rise, revert instantly and regenerate. No studio bookings, no multi-week delays-just accurate, on-brand photos your kitchen can deliver. Start on the Starter plan and scale only if the winners perform.
Continue exploring:
FAQ
Can I use my own photos as the starting point?
Yes-this is the best way to keep images honest. Shoot near a window in indirect daylight, use a neutral surface, and aim for a 45? angle plus one top-down shot. Upload your reference to Yummify; the system validates it’s food before processing. Starting from your real plate keeps portion, build, and ingredient accuracy grounded.
How does this compare to hiring a photographer?
Traditional shoots often run $3,000-6,000 for 20 dishes and take 2-4 weeks. Yummify can produce menu-ready images in hours at a fraction of the cost, with selective high-resolution upgrades for your best performers. Many teams use both: Yummify for volume and speed, a photographer quarterly for hero campaigns. It’s a budget-smart split that keeps menus fresh without sacrificing flagship visuals.
What if my food doesn’t photograph well?
Use natural light, avoid overhead kitchen fluorescents, and plate like you do during service-not a one-off special build. If the reference still struggles, generate from a text description, but keep it tightly aligned to your real ingredients and portion. Compare the result to a fresh plate and regenerate if variance exceeds about 10%. You can also simplify garnishes to what your line can replicate consistently.
Do I need special equipment or a studio?
No. A recent iPhone or Android, a neutral surface (sheet pan, butcher paper, or a simple board), and window light are enough. Stabilize with a small tripod or a stack of cups if needed. Yummify handles the styling and background environment, so you can keep production lightweight while staying true to your dish.
How long does it take to learn Yummify?
Most teams can build their first Branded Environment in 30-45 minutes. Expect 3-5 minutes per dish at standard quality to generate and review options. Plan a one-hour session to QA 10-12 items against fresh plates. After the first week, you’ll be iterating faster than traditional editing with more consistent results.
Do I need to disclose that images were styled with AI?
Laws vary by region, and this isn’t legal advice. As a best practice, add a short note like “Styled with AI from our actual dish,” especially on websites and menus where you control the UI. It sets honest expectations and can defuse complaints. For marketplaces with limited space, use alt text or a small caption where possible and ensure the visual still matches your real plate.
How do I avoid issues on delivery apps?
Use images that reflect your actual build, portion, and color. Avoid stock photos and don’t add ingredients your SKU doesn’t include. Keep a screenshot or export of your Honest Image Charter and a quick photo of the plated dish used to QA each image. If a platform flags an image, you’ll have documentation ready to show you acted in good faith.
Related posts

15 Creative Food Photography Ideas to Make Your Dishes Stand Out
Discover creative food photography ideas to make your dishes stand out. Learn action shots, deconstructed dishes, unique angles, storytelling, and AI tools for stunning food visuals.

Beyond Burgers: AI Food Styling for Diets and Cuisines
Use AI food styling to create accurate vegan, gluten-free, halal, kosher, and global cuisine photos that convert across delivery apps, QR menus, and social.

Close the Loop: Tie Food Imagery to Analytics and Sales
Stop guessing which food photos work. Learn a simple workflow to tie Yummify images to analytics, A/B test visuals, and promote only the photos that actually sell.