Food Brand Photos: Visual Same look That Converts
Quick navigation:
- [Why Visual Same look Matters in Food Branding](#why-visual-same look-matters-in-food-branding)
- Creating a Full Brand Style Guide
- Mastering Color Palettes and Prop Libraries
- Establishing Lighting Standards for Appetizing Shots
- [Using AI to Enforce Brand Guidelines On its own](#using-ai-to-enforce-brand-guidelines-on its own)
Why Visual Same look Matters in Food Branding
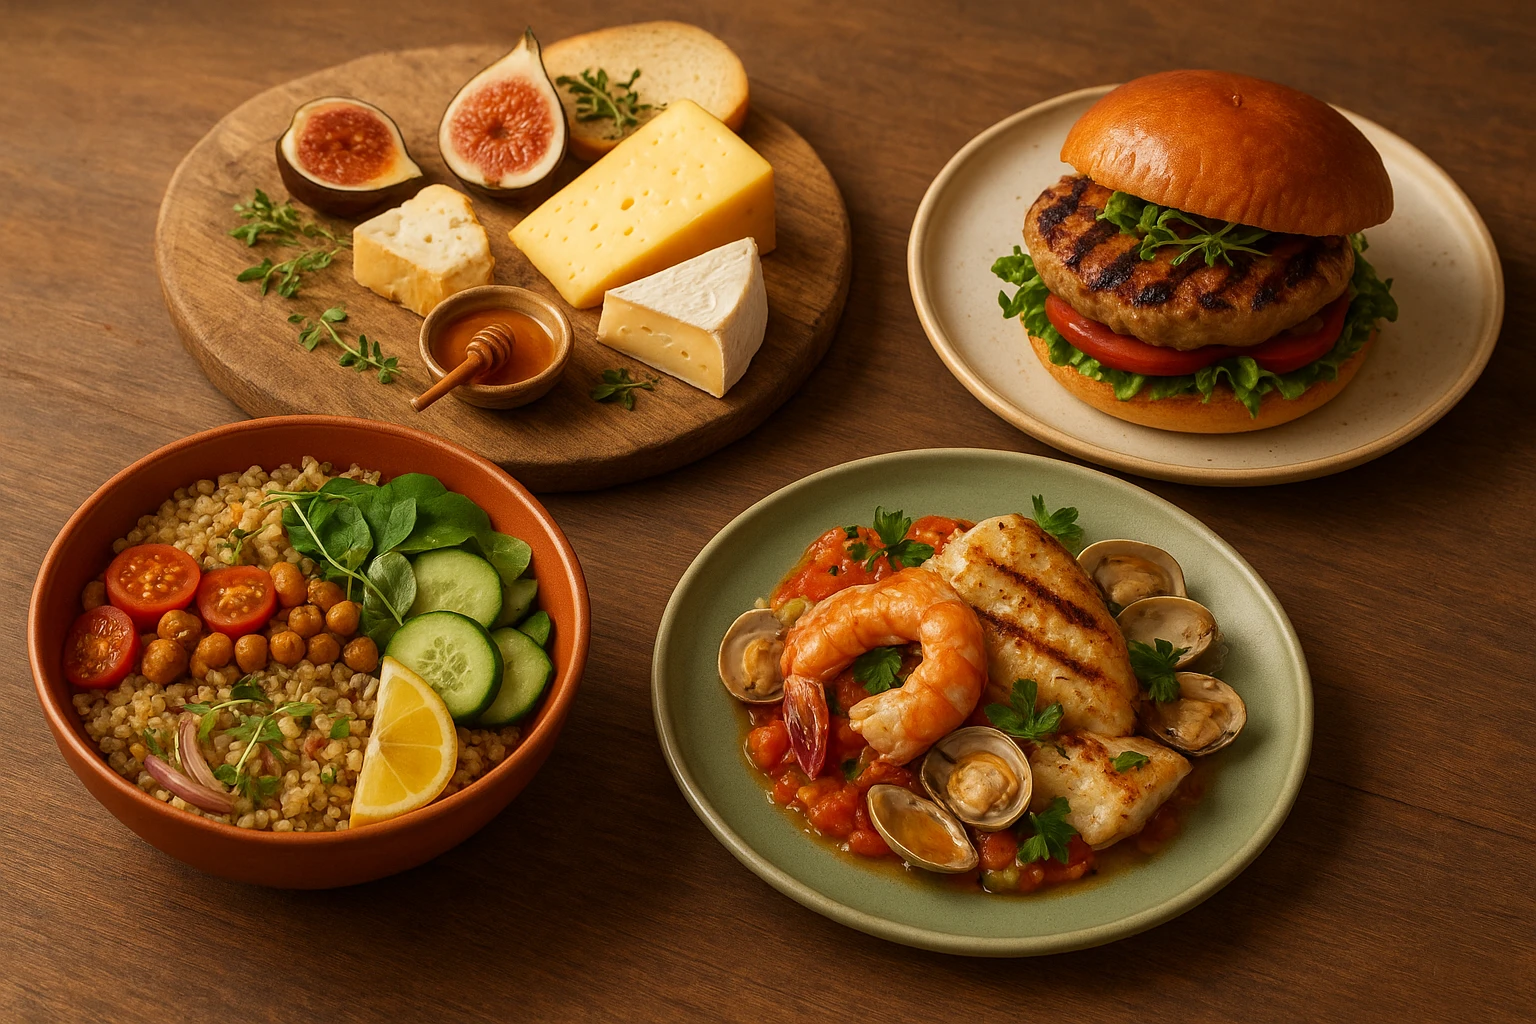
Your food photos are often the first time buyers see your brand. They see it scrolling through Instagram. They spot it on delivery apps. They notice it on your website. Those images form quick first thoughts. Inconsistent visuals confuse buyers and dilute your brand identity. A unified look builds trust and recall. Research shows that consistent brand presentation across all platforms increases revenue by up to 23%. Your food photos are a big part of that.
When your visual style shifts, buyers struggle to connect the dots with your food brand photos. One photo looks bright and minimal on Instagram. Another appears dark and moody on your website. Your delivery app images look fully different. This visual chaos signals a lack of care for detail. It makes buyers question your food quality too. Steady visuals, by contrast, create a quick sense of polish. They show you’re reliable-just what hungry buyers want before placing an order.
Think about how major food chains do this. Every location uses the same brand images, color grading, and lighting style. You recognize their food instantly. It could be on a billboard, in an email, or on social media for food brand photos. Small and mid-sized food spots can get the same recall. The secret is deliberate visual same look. Treat your food images as part of your brand identity system, not as an afterthought.
Table: Impact of Visual Same look on Food Brand Performance
| Same look Level | Customer Trust | Brand Recognition | Conversion Rate | Perceived Food Quality |
|---|---|---|---|---|
| Low (mixed styles, lighting) | 34% | 22% | 1.8% | 3.2/5 |
| Medium (some guidelines followed) | 58% | 47% | 3.1% | 4.1/5 |
| High (strict visual standards) | 81% | 73% | 4.9% | 4.6/5 |
The thinking behind this is simple. Humans crave patterns and same look. When your images follow a clear visual style, buyers feel more at ease. They feel confident. They know what to expect. That ease turns into orders. Mixed images creates hidden worry. Something feels “off” even if viewers can’t say why.
Putting effort into steady food brand photos visuals isn’t about looks for looks’ sake. It’s a business decision that affects your bottom line. Buyers make quick calls about whether to trust your food. They’re deciding with their appetite and their money. Your visuals either validate that trust or undermine it.

Creating a Full Brand Style Guide
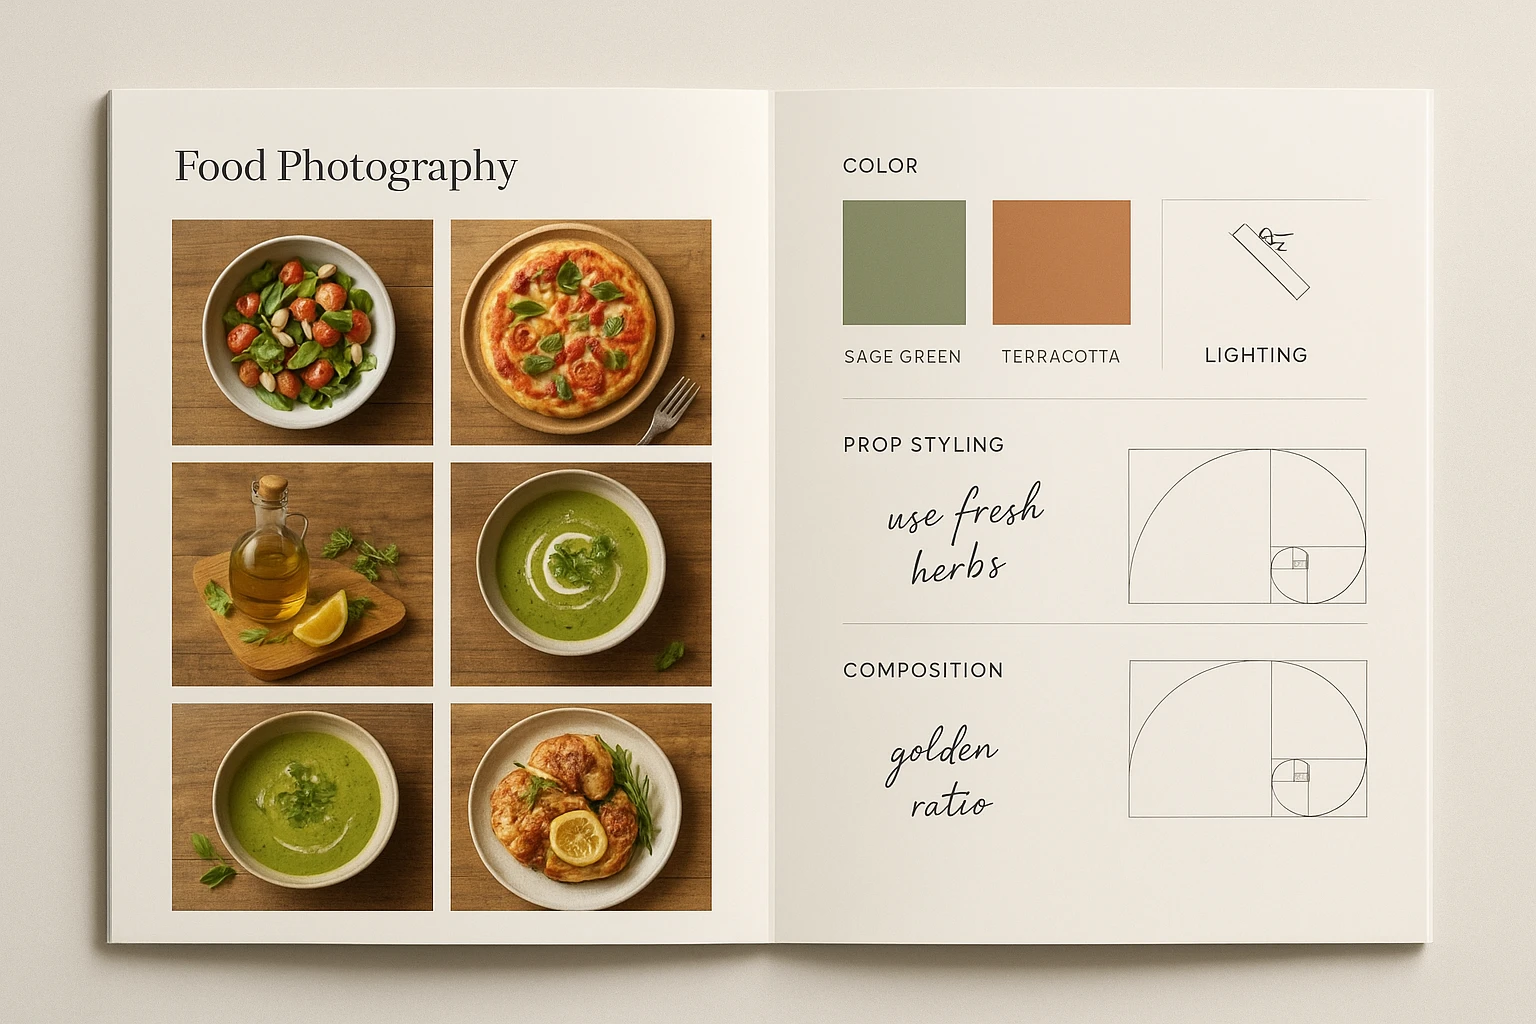
A brand style guide for your food photos cuts out guesswork. It ensures anyone making images for your brand produces consistent results. You might work with photo pros, agencies, or AI tools. Your style guide serves as the single source of truth for food brand photos. The most effective guides are visual, specific, and accessible. They’re not vague docs sitting in a lost folder. As outlined in brand style guide best practices, same look requires clear documentation that anyone can follow.
Start with your brand’s visual vibe for food brand photos. Is your brand warm and rustic? Bright and health-conscious? Premium and minimalist? Document this in concrete visual terms. Instead of saying “our style is fresh,” specify: “use natural daylight with white balance between 5000-5600K, slight underexposure (-0.3 EV) to preserve highlights, and minimal color saturation.” These specs ensure you can copy the results. They work with any photo pro or tool.
Your style guide should include detailed sections. Cover lighting direction and quality. Add camera angles and framing. Include color grading specs. List acceptable and prohibited props. Document background and surface textures, plating rules, and file naming conventions. Include example images labeled “do this” and “don’t do this.” Visual samples say more than blocks of text.
Checklist: Essential Components of a Food Photos Style Guide
- Lighting specs: Direction (backlight, sidelight, flat lay), type (soft, diffuse, hard shadows), color temp, and wanted shadow traits
- Color palette document: Hex codes for brand colors. Include acceptable accent colors and prohibited color mixs. List white balance settings
- Surface and background library: Approved textures, materials, colors with example images and sourcing links
- Prop guidelines: Style categories, materials, sizing relative to food, placement patterns, clutter limits
- Layout rules: Camera angles (45-degree standard, overhead for flat lays, etc.). Include framing rules and blank space needs. Add main subject placement
- Color grading presets: Before/after examples, specific adjustment values, and approved LUTs or filter names
- File standards: Naming conventions, minimum dimensions, export formats, resolution requirements, and quality settings
- Platform specs: Instagram dimensions, DoorDash requirements, website hero sizes, email header specs
- Brand vibe examples: 10-20 annotated images showing exactly what your brand looks like. Add notes on why each works
Make your guide living documentation. As your brand evolves, update the guide. Schedule quarterly reviews to add new learnings. Remove outdated guidelines. When you find images that perform very well, reverse-engineer them. Add those specs to your guide. When something flops, analyze what deviated from your standards. Add that as a cautionary example.
The most powerful aspect of full food branding visuals style guides? It scales. You can hand this document to a new photographer or an agency. You can configure AI tools to follow these parameters exactly. A steady look happens on its own. It’s no longer tied to one person’s know-how. Your brand images keeps its unique look no matter of who-or what-is making the images.
Mastering Color Palettes and Prop Libraries
Color thinking deeply affects hunger and buying choices for food brand photos. Your brand photos should use a well-planned color set. It should reinforce your brand identity while making food look hard to resist. Food styling work shows warm tones (oranges, reds, yellows) boost hunger. Cool tones (blues, greens) say fresh and healthy. The best brand images use a unique color set. It shows up in every photo, making for quick visual recall.
Start by defining your brand’s primary colors for photos. Pick a dominant background color. Add two supporting accent colors. Choose one pop color used sparingly for emphasis. For example, a health-focused brand might use sage green backgrounds. It could add cream and wheat accents, with bright basil green as the pop color. A premium steakhouse could use charcoal gray backgrounds. Add copper and bronze accents, with deep red wine for emphasis. Write these as exact hex codes or paint swatches, not vague color names.
Your prop library deserves equal attention. Scavenging props for each shoot results in visual chaos. Instead, keep a curated collection of on-brand props for brand food images. Use them repeatedly. This doesn’t mean boring repetition. It means thoughtful selection of vessels, linens, utensils, and garnishes. Every prop should earn its place. It either backs up the main dish or shows brand style. As food styling prop experts recommend, building a consistent prop library transforms your images from amateur to pro.
Table: Building Brand-Appropriate Prop Libraries
| Brand Type | Surface Materials | Dishware | Linens | Garnishes | Avoid |
|---|---|---|---|---|---|
| Rustic/Farmhouse | Reclaimed wood, slate, stone | Handmade ceramics, enamelware | Woven textiles, burlap | Herb sprigs, citrus wedges | Polished metals, plastic |
| Modern/Minimal | Marble, concrete, white surfaces | Porcelain, glass plates | Crisp linen, no textiles | Microgreens, edible flowers | Rustic wood, busy patterns |
| Premium/Steakhouse | Dark wood, charcoal surfaces | Stoneware, copper vessels | Leather, dark fabrics | Rosemary, peppercorns | Bright colors, casual items |
| Health/Fresh | Light wood, bamboo | Matte ceramics, wood bowls | Unbleached linen | Fresh herbs, seeds | Heavy sauces, dark backgrounds |
Organize your prop library by category. Document each item’s specs. Snap a photo of every prop in your standard lighting to see how it looks. Some ceramics look perfect in person but cast strange shadows. Others reflect bad light. Test thoroughly before adding to your approved library. Label storage containers clearly. Keep an list spreadsheet with photos and sourcing links. Add replacement notes and cleaning instructions.
For color same look, create color grading presets. These apply your signature palette to every image. You might shoot in natural light, use AI generation, or work with photographers. These presets ensure your color treatment remains the same across all images. Document the specific adjustment values: temp, tint, exposure, highlights, shadows, clarity, vibrance, saturation. When different creators can apply the same preset, your images keeps cohesion.
Putting thought into color sets and prop picks creates quick brand recall. Buyers see an image with your specific surfaces, dishware, garnishes, and color treatment. They know it’s yours right away-before even seeing your name or logo. That’s the power of consistent visual language working for your brand.

Establishing Lighting Standards for Appetizing Shots
Lighting turns food from just seen to truly craved. Your brand photos need written lighting rules for consistent food photos. These ensure every image makes your dishes look appetizing. Inconsistent lighting undermines brand recall. Bright and direct one day, dark and moody the next-it fails to present food at its most appealing. Pro food stylists stress that steady lighting is what sets pro shots apart from amateur ones.
Natural light remains the gold mark for food photos. It makes food appear fresh and honest. The most tasty-looking images tend to use backlight or sidelight. Position your subject near a large window or diffused light source. Backlighting creates nice highlights and shadows that reveal texture. Think crispy skin, glossy glazes, fresh condensation. Sidelighting brings out dimension and brings out surface details. Front lighting, by contrast, tends to flatten food. It makes dishes look less interesting. Document your preferred lighting direction and angle with specific measurements.
Quality of light matters as much as direction. Direct, harsh sunlight creates unappealing shadows and blown-out highlights. Soft, diffuse light wraps food gently. It reveals textures without noise. If shooting with natural light, specify the acceptable conditions. For example: “overcast days or window light with north-facing exposure between 10am-2pm.” For artificial light, document equipment specs. Include softbox dimensions, diffusion material, power settings, distance to subject, and fill light requirements.
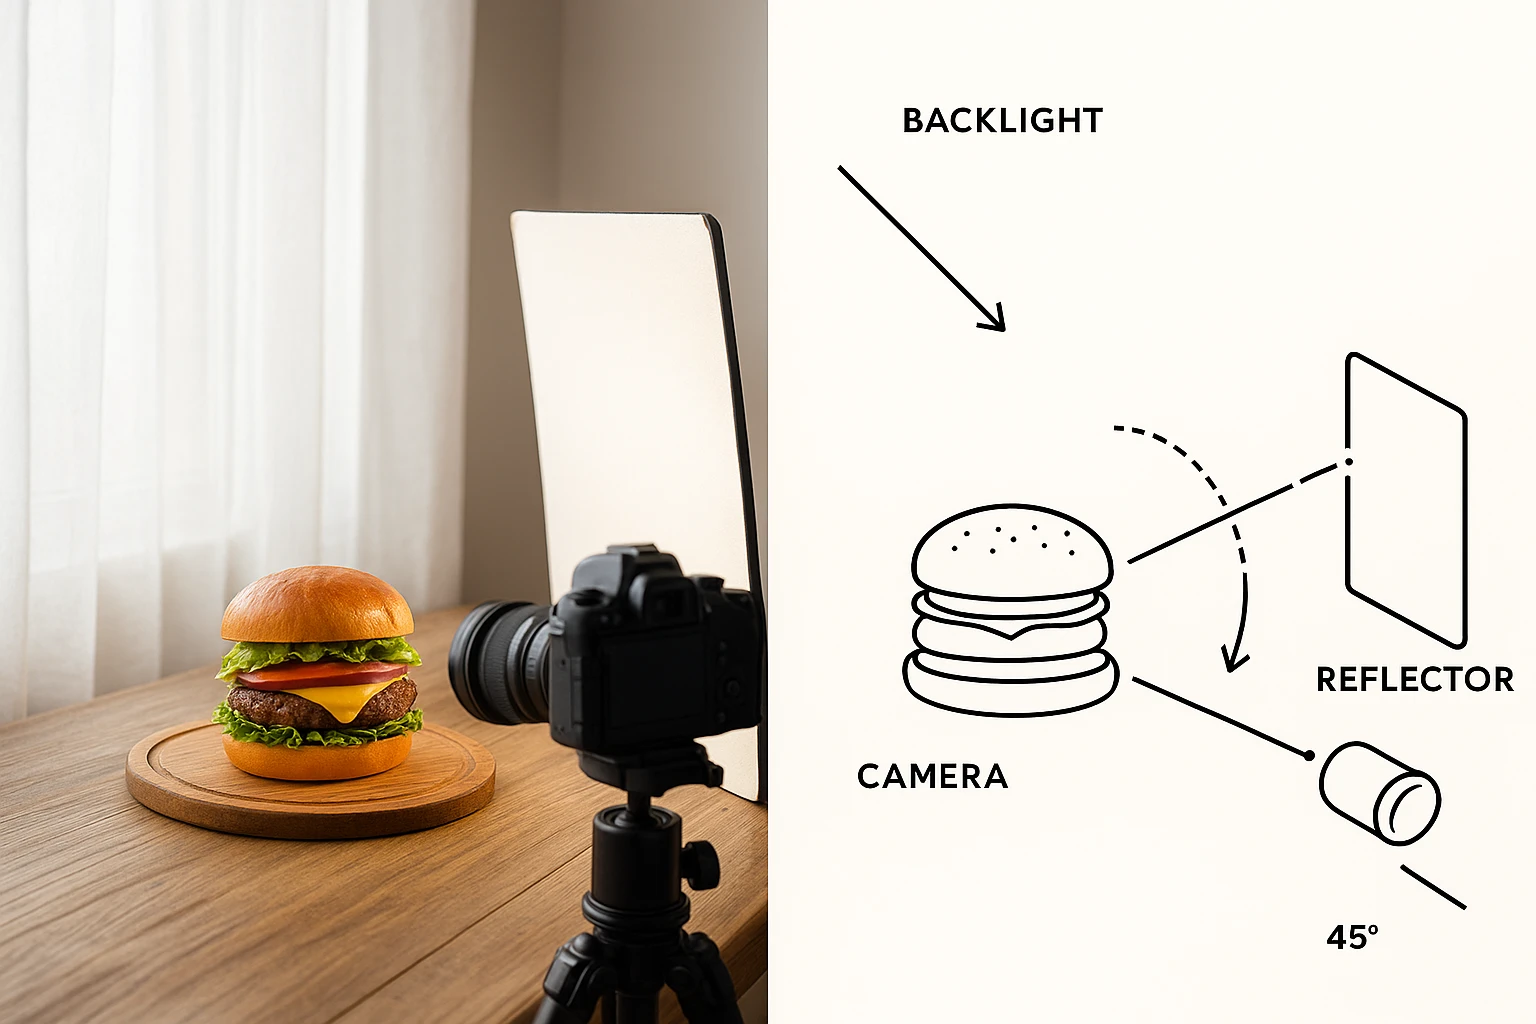
Numbered Steps: Standard Food Photos Lighting Setup
- Position your food subject 3-4 feet from your light source (large window or softbox) with the back or side angled toward the light at about 45 degrees
- Place a diffusion panel or white sheer curtain between light and subject to soften harsh shadows and create even light across the dish
- Add a white foam core reflector on the shadow side at 45 degrees, positioned to bounce light back into dark areas and reduce contrast while keeping dimension
- Use a fill card (silver or white depending on desired intensity) on the opposite side. This further balances shadows if needed. Adjust the distance based on how much fill you want
- Check for unwanted reflections in glossy surfaces or utensils and adjust angles slightly to eliminate jarring hotspots while preserving appetizing shine
- Capture test shots and review on a calibrated display, making micro-adjustments to reflector distances and angles until shadows are visible but not harsh
- Document your final setup with measurements and photos so this exact setup can be copied for future shoots
Sometimes seeing the setup in action for food brand photos makes all the difference. This quick tutorial demonstrates how to create that seamless infinite background that’s become a staple of pro food photos:
Fake light needs even more exact records. Small changes have a big impact on results. Specify: light modifier type (softbox, umbrella, octabox), size relative to subject, distance and angle, power output, color temp, diffusion layers, reflector placement, and fill light ratios. When using AI image generation, translate these technical specs into descriptive prompts. For example: “soft diffuse window light from upper left, gentle shadows, slight backlight for dimension, no harsh highlights, natural daylight color temp around 5500K.”
Time of day affects natural light color and quality. Document acceptable shooting windows. Morning light tends to be cooler and bluer. Midday light (above all overhead) creates bad shadows. Late afternoon “golden hour” adds warmth. This can enhance certain foods. But it can clash with others. Test different times. Document what works for your brand aesthetic and food types.
Your lighting standards should also specify shadow traits. Some brands prefer minimal shadows for a clean, modern look. Others embrace dramatic shadows for moody, premium style. Neither is wrong. Mixed styles is the problem. Document your preference with examples. For instance: “shadows should be visible but soft, with clearly defined edges, about 2-3 stops darker than highlights.” Specific parameters ensure easy to copy results.
Appetizing food images requires attention to how light interacts with different textures. Glossy foods (glazed meats, sauces, dressings) need controlled lighting. Avoid blown-out specular highlights while preserving nice sheen. Matte foods (baked goods, roasted vegetables) benefit from slightly more directional light. This reveals surface texture. Fried foods need backlighting to highlight crispiness without looking greasy. Document food-specific lighting notes in your guide for maximum impact.
When your lighting standards are documented and followed the same way, every dish looks its absolute best. Buyers recognize your brand not just from colors or props. They recognize that unique appetizing quality that only careful, consistent lighting provides.
Using AI to Enforce Brand Guidelines On its own
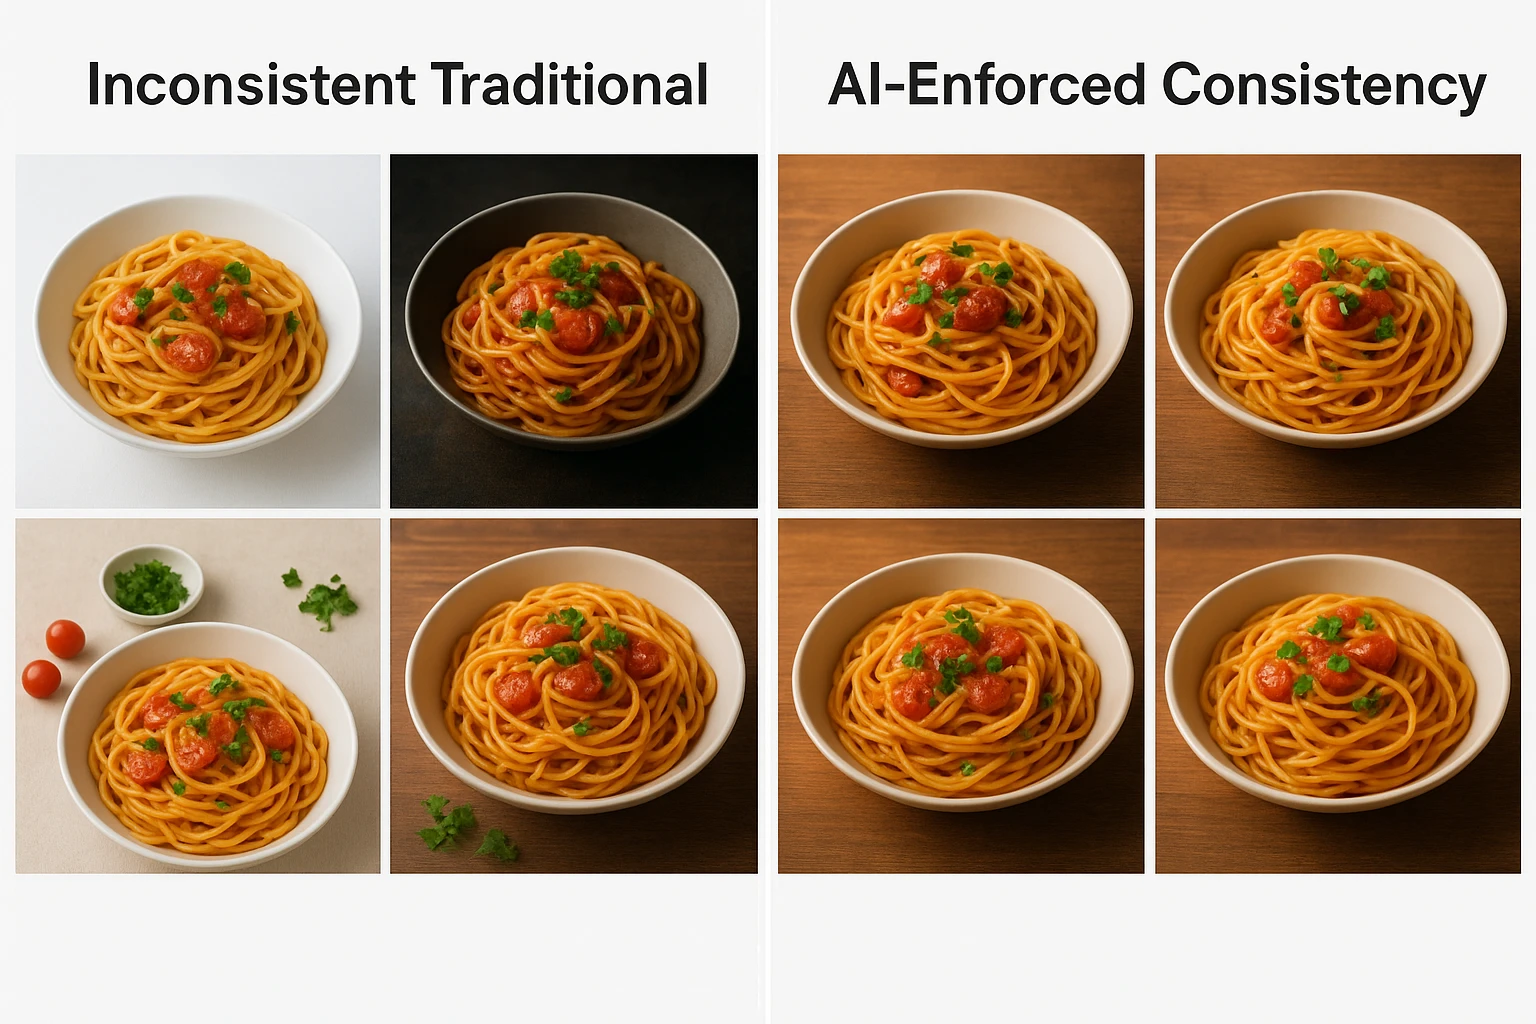
Keeping visuals steady across hundreds of images by hand takes a lot of work. It’s prone to human error. This is where AI-powered brand photos shift from a dream to real-world use. Modern AI tools can apply your brand guidelines on its own. Every image follows your style guide without constant checks. [Brand experts note](https://www.bynder.com/en/blog/ai-and-brand-same look/) that AI excels at doing repeat tasks with care. That’s exactly what consistent brand visuals require.
AI platforms like Yummify let you create branded spaces. These encode your entire brand look into reusable presets. Define your lighting parameters once (direction, quality, color temp). Specify your color palette. Select your preferred surfaces and prop styles. Set composition rules. The AI applies these specs to every image generated. This cuts out the shifts that come with using many photo pros. Your branded space becomes a brand enforcement tool that works at scale.
Think about the workflow gains. Standard shoots require briefing each photographer on your style guide for food brand photos. You hope they interpret it correctly. You review initial images to correct deviations. With AI, you configure your branded space once. You validate that output matches your standards. Then you generate unlimited consistent images on its own. No repeated briefings. No misinterpretations. No gradual style drift over time. Your brand images remains locked to your specs for good.
Table: Standard Photos vs. AI-Enforced Brand Same look
| Aspect | Standard Photos | AI with Branded Environments |
|---|---|---|
| Initial Setup | Style guide creation + photographer briefing | Configure branded space once |
| Same look | Varies by photographer interpretation | Identical every time (100% easy to copy) |
| Scaling | Requires retraining each new photographer | Automatic-no additional effort |
| Speed | 2-4 weeks per shoot + revision time | Minutes per image |
| Iteration | Expensive reshoots for style adjustments | Instant regeneration with new parameters |
| Quality Control | Manual review of every image | Automated same look + spot checks |
| Cost per Image | $150-300+ each | Subscription-based, set pricing |
| Multi-Platform | Separate shoots for each format | Generate all formats at once |
AI brand rules work great when running many sites or chains. Each location can generate images using the same branded spaces. This ensures the entire chain presents a unified brand look. No more location A shooting bright and minimal while location B goes dark and moody. Head office keeps control. Single locations get the images they need without waiting for centralized resources.
The tech lets you A/B test at scale without hurting the steady look. Generate variations of the same dish with different styling approaches. Keep your core brand parameters throughout. Test bright versus moody, minimal versus prop-heavy, overhead versus 45-degree angles. All within your brand guardrails. Measure which versions perform best on Instagram, DoorDash, or your website. Then scale the winners. This data-led tuning was too costly with old-school shoots.
For food spots with big menus, AI brand rules mean full visual updates in days rather than months. Launch a seasonal menu? Make pro images for 20 new dishes in a few hours. All perfectly matched to your existing brand images. Rebranding initiative? Set up a new branded space and redo your whole photo set on its own. The agility that AI provides lets your brand look evolve alongside your business. No massive budgets required.
Doubters worry that AI kills human spark from brand photos. The reality is different. AI handles the execution-applying your guidelines the same way. Humans direct the creative strategy. You define the brand vision. You choose the aesthetics. You make the strategic decisions. AI executes those decisions tirelessly at scale. It’s not replacement. It’s boost of your creative direction.
The businesses winning at brand food images today combine thoughtful brand strategy with AI-powered execution. They create unique visual identities through carefully crafted style guides. They use AI to apply those guidelines across every image on its own. Same look that once required massive ongoing investment becomes doable and flexible. Your brand recall grows. Your conversion rates improve. Your costs become set rather than per-project spirals.
This is the future of brand food visuals and food brand photos: strategic creativity enhanced by AI same look. Not limited by production constraints. The brands that embrace this mix will dominate visual channels. Rivals will struggle with broken, mixed photos that fail to build recall or trust.
Next steps
Building steady brand visuals doesn’t need a huge budget or nonstop hand-holding. Start by documenting your visual style guide. Include specific parameters for lighting, colors, props, and composition. Then use Yummify’s AI-powered branded spaces to enforce those guidelines on its own. Create your signature look once. Apply it to your entire menu. Keep perfect brand same look whether you need 10 images or 1,000. Your buyers will recognize your brand instantly-before they even read your name. That visual recall builds trust. Trust drives orders. Ready to transform your food images from inconsistent to top-notch?
FAQ
What is food brand photos and why does same look matter?
Brand food photos cover all images that stand for your food spot across sales channels. Staying the same matters because unified visuals build buyer trust and brand recall. Research shows consistent brand presentation can increase revenue by up to 23%. When your Instagram, website, and delivery app images share the same lighting, colors, and styling, buyers know your brand right away. They feel more sure when ordering.
How many photos do I need for consistent brand visuals?
Quality and a steady look matter more than count. Start with 10-15 perfectly on-brand images covering your most popular dishes. Ensure these images follow your style guide perfectly. Lighting, colors, props, and composition should all align. Use these as your north star. Then expand step by step. Generate or shoot additional images using the same guidelines. It’s better to have 20 consistent images than 100 inconsistent ones.
What should I include in a food styling guide?
Your style guide should document lighting specs (direction, quality, color temp). Include color palette (hex codes for brand and accent colors). Add a prop library (approved surfaces, dishware, linens with photos). Include composition rules (camera angles, framing, negative space). Add color grading presets (before/after examples with specific values). Include platform specs (dimensions for each channel). Use visual examples labeled “do this” and “don’t do this.” This makes guidelines right away clear.
Can AI really match the quality of pro photographers?
AI excels at same look and speed. It doesn’t replace top-tier creative work. Many successful businesses use both. AI handles volume content (daily social posts, delivery apps, menu updates). Pro photographers handle premium campaigns (brand hero shots, seasonal features, cookbook covers). AI-made photos look polished and stay the same. Pro photo pros bring art vision for big projects. Think of it as paired tools rather than either/or.
How much does consistent brand images cost?
Standard pro shoots cost $150-300 per dish. A session covering 4-6 dishes runs $500-1,000. A full menu photoshoot (20+ dishes) typically runs $3,000-6,000. Add 2-4 weeks of production time. AI-powered solutions like Yummify use subscription-based credit pricing. You can generate unlimited consistent images for a set monthly cost. Most spots find the AI approach pays for itself within 1-2 months. This is above all true when factoring in iteration and A/B testing tools.
How do I keep same look when working with multiple photographers or locations?
Write your style guide with exact detail. Include example images, not just written descriptions. Provide branded space presets or detailed briefs for every shoot. Review initial test shots before committing to full production. For multi-location businesses, consider centralizing image creation through AI tools. Don’t rely on each location’s skills. This keeps the whole chain looking the same no matter who makes the images.
What’s the least I need to spend for brand visual steadiness?
Start with a core style guide documenting your visual preferences. Choose 3-5 signature dishes. Generate or photograph them using those guidelines. Test across platforms to ensure they perform. That’s your foundation-roughly 10-15 hours of planning plus generation or photo costs. From there, expand step by step as budget allows. Many spots find that even 20-30 steady images greatly boost their visual look. That beats hundreds of scattered, inconsistent photos.
Related posts

15 Creative Food Photography Ideas to Make Your Dishes Stand Out
Discover creative food photography ideas to make your dishes stand out. Learn action shots, deconstructed dishes, unique angles, storytelling, and AI tools for stunning food visuals.

Close the Loop: Tie Food Imagery to Analytics and Sales
Stop guessing which food photos work. Learn a simple workflow to tie Yummify images to analytics, A/B test visuals, and promote only the photos that actually sell.

Simple Capture Habits For Better AI Food Photos
Teach your team simple capture habits so everyday phone photos become AI-ready food images that perform on delivery apps, powered by Yummify.