15 Creative Food Photography Ideas to Make Your Dishes Stand Out

Quick navigation:
1. Capture the Moment: Dynamic Action and Motion Shots
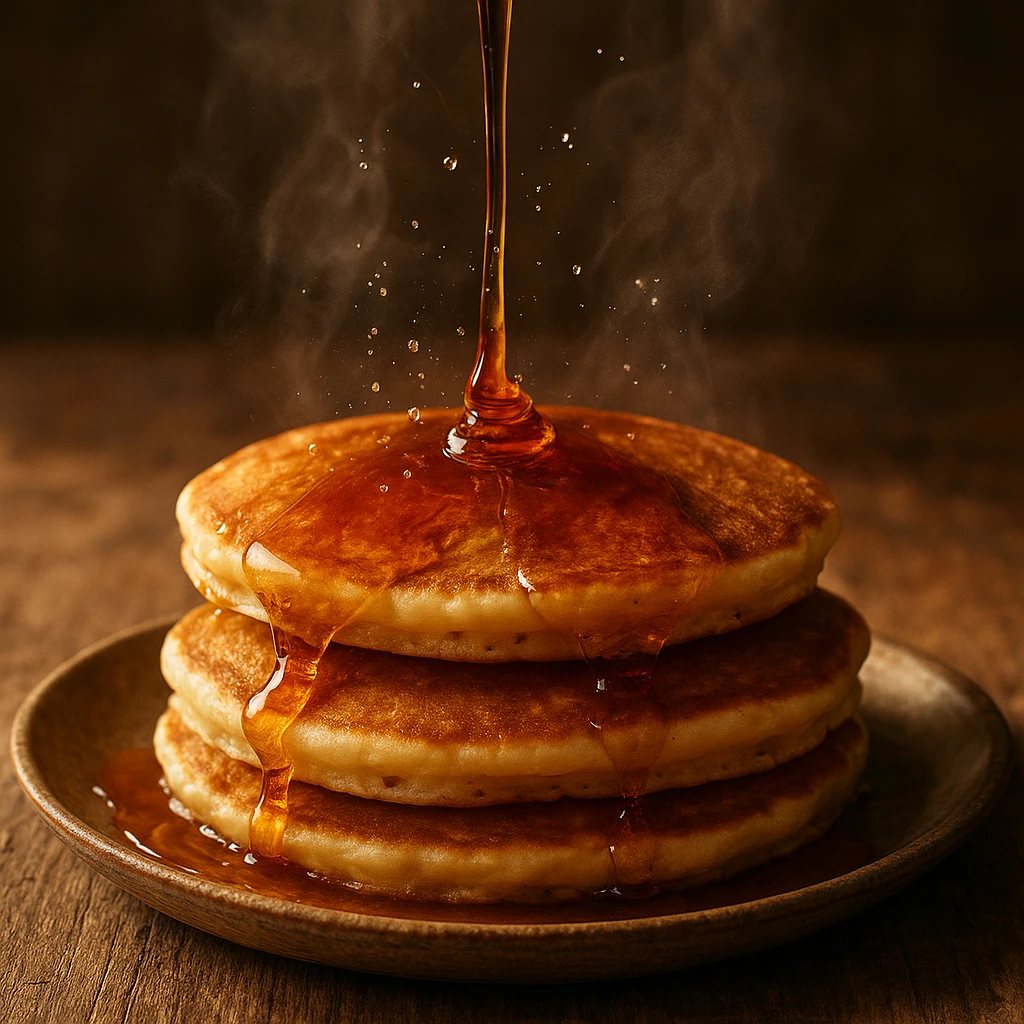
Nothing grabs attention like food in motion. Syrup cascading over pancakes. Steam rising from a hot bowl. A knife slicing through a juicy burger. Action shots create energy and anticipation. These dynamic moments make viewers practically taste the food through the screen.
For example, pour maple syrup slowly over warm pancakes to capture golden drips. Set your phone to burst mode to catch the perfect flowing moment. Creative food photography shines when you practice the pour three times first.
Why Action Shots Work
Our brains are wired to notice movement. Static food photos can be beautiful. But action images trigger something deeper. They suggest a story unfolding. A pouring shot implies freshness and abundance. A garnish falling onto a dish suggests the final perfect touch. These are not just pictures. They are moments captured in time.
Also, capture steam rising from hot food within thirty seconds of plating. Shoot near a window with natural side light to make vapor visible. Creative food photography works best when steam contrasts against dark backgrounds.
Essential Action Shot Techniques
Freeze vs. Motion Blur: You have two creative paths. Freeze everything crystal-clear with fast shutter speeds (1/500s or faster). This creates that frozen-in-time look. Or use motion blur with slower speeds (1/60s). This highlights movement and works great for pouring liquids.
Timing is Everything: Some actions are repeatable (pour, sprinkle, cut). Others are one-shot deals (carbonation bubbles rising). For repeatable actions, practice the timing before committing to the shot. Use burst mode to capture the exact millisecond when the action peaks.
Work with Gravity: Let physics be your co-creator. Falling ingredients, bouncing droplets, and cascading sauces create natural visual interest. The key is directing what falls where. Use spoons, pipettes, or pour-spouts to control the flow.
Popular Action Shots by Food Type
Different foods need different actions. This table shows what works best for each category.
| Food Category | Signature Action | Setup Difficulty |
|---|---|---|
| Beverages | Pouring, splashing, bubbles | Medium |
| Breakfast | Syrup pouring, butter melting, steam rising | Easy |
| Desserts | Sauce drizzling, garnish sprinkle, cake cutting | Easy |
| Fried Foods | Steam rising, oil glistening, bite marks | Medium |
| Salads | Tossing, dressing pouring, crunch visible | Hard |
Practical Setup Tips
You don’t need pricey gear. A smartphone with burst mode works for most action shots. The secret is prep work. Have everything staged before you start the action. Pre-melt your butter. Pre-heat your food so steam shows up. Practice the pouring motion.
Lighting matters too. Side lighting emphasizes texture and creates shadows that reveal motion. Back lighting creates dramatic silhouettes for translucent liquids. Avoid flat front lighting that kills depth.
When to Use Action Shots
Action shots shine in specific cases. Social media ads gain from the energy and movement. Menu hero photos build appetite appeal. Blog headers stop the scroll. This creative food photography style works well for content that needs to grab attention fast. But action isn’t always the right choice. Elegant dishes like fine cheese plates may not need motion. For more tips, read our guide to smartphone food photography tips.
The beauty of artistic food shots is finding what motion makes sense for your specific dish. Not everything needs to splash or pour. Sometimes the perfect action is subtle. A single herb leaf drifting down to land gently on a composed plate.
2. Breaking It Down: Deconstructed Dishes and Ingredient Explosions
Some of the most compelling food photos reveal what’s beneath the surface. Deconstructed dishes showcase components individually. Ingredients are artfully separated and arranged. They hint at their harmonious combination. This approach satisfies curiosity about how dishes are built. It also creates visual rhythm through repetition and variation.
The Psychology Behind Deconstruction
There’s something mesmerizing about seeing a dish disassembled. It’s like looking at a blueprint rather than a finished building. Suddenly the complexity becomes visible. Viewers appreciate the craftsmanship. They recognize individual quality ingredients. They understand flavor combinations before ever taking a bite. This transparency builds trust and anticipation.
Types of Deconstructed Shots
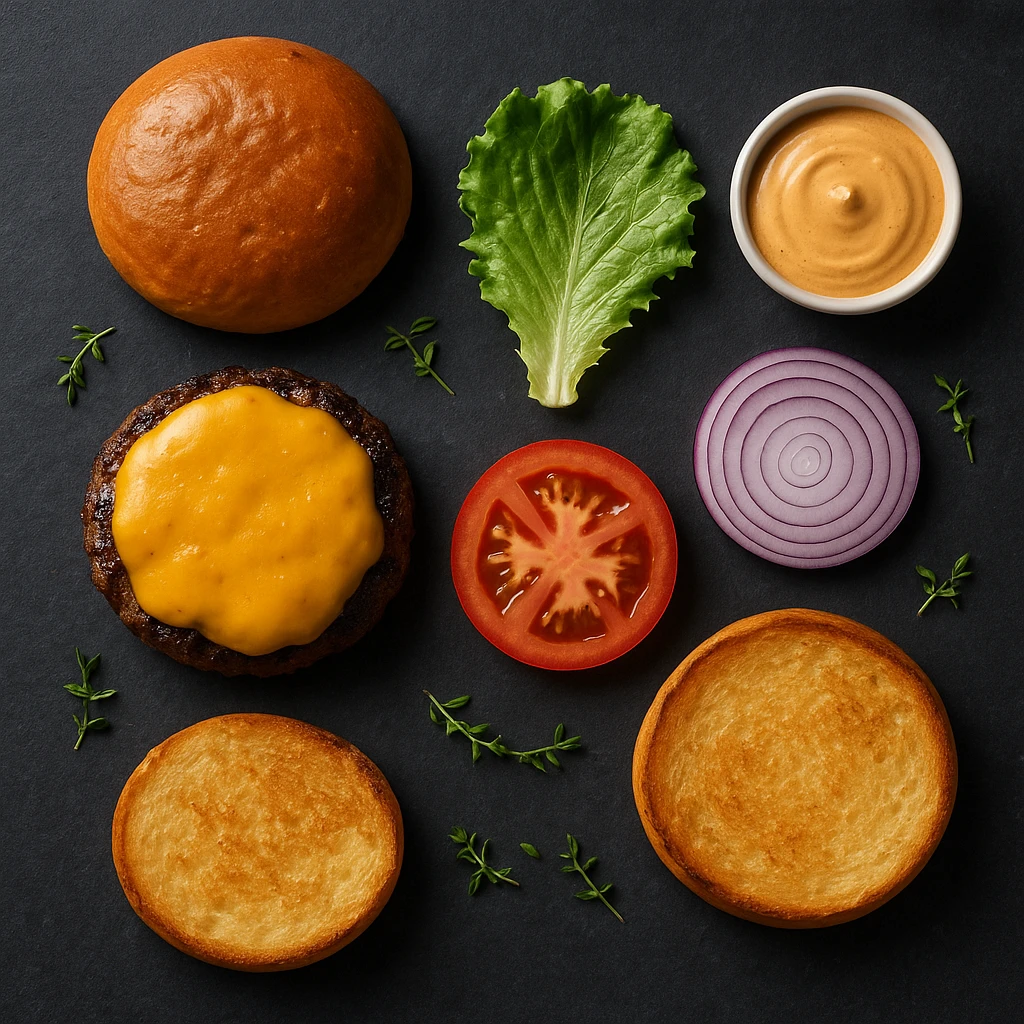
The Layer Reveal: Perfect for burgers, sandwiches, lasagna, and parfaits. Stack items with slight offsets so each layer shows clearly. The bottom bun, then sauce, lettuce, patty, cheese, tomato, top bun. Each part gets its moment in the spotlight. This works really well because it creates depth and tells a story of assembly.
The Ingredient Scatter: Arrange all parts in a circular or linear pattern around the empty plate. Picture a pizza with crust apart, sauce pooled, cheese shredded, toppings grouped in mini-piles. This method highlights ingredient quality and freshness. It’s both educational and pleasing to the eye.
The Process Timeline: Show three stages side by side: raw items, mid-prep, and finished dish. This works great for foods that change a lot during cooking. Think dough rising, meat marinating, or veggies roasting. The progress story engages viewers and shows true process.
Building Your Deconstructed Shot
Step-by-Step Arrangement Guide
-
Select Your Surface: Pick a background that fits but doesn’t compete. Neutral tones work best. Gray slate, white marble, weathered wood. Your items are the stars. The stage should fade back.
-
Map the Layout: Plan where each item goes before moving any food. Think about color spread. Scatter reds (tomatoes, peppers) across the frame instead of grouping them. Balance textures by putting crunchy items next to smooth ones. Create visual flow that guides the eye through the shot.
-
Prep Each Item: This is where styling patience pays off. Wipe tomato slices dry since wet spots look messy. Arrange leafy greens with care. Flatten some, ruffle others for natural look. Slice evenly but not perfectly. Natural gaps look more real.
-
Build Height with Separation: Use small stands, overturned ramekins, or wadded paper towels to lift certain elements. Creating varying heights adds dimension. The main component might sit on a small platform while garnishes scatter around the base.
-
Light for Depth: Side lighting at a slight angle brings out shadows and adds depth. Deconstructed shots live or die by their sense of space. Each item needs its own light and shadow to stand apart.
Best Dishes for Deconstruction
Some dishes work better than others for this style. Here’s what deconstruction does for each food type.
| Dish Type | Deconstruction Approach | Visual Payoff |
|---|---|---|
| Burgers | Layer offset stacking | Shows quality and abundance |
| Salads | Ingredient ring around bowl | Emphasizes freshness and variety |
| Tacos | Components fanned around shell | Reveals flavor complexity |
| Cocktails | Ingredients encircling glass | Demonstrates craft and care |
| Pizza | Slice separated + topping piles | Showcases crust and toppings individually |
Common Mistakes to Avoid
The biggest error in deconstructed shots? Making it look messy rather than artful. There’s a fine line between “planned” and “spilled.” Every item should feel placed on purpose. Avoid random tossing. Create visual ties between items. Think about the rule of thirds, color harmony, and empty space to guide your arrangement.
Another pitfall: losing the tasty appeal in favor of cold precision. The goal isn’t sterile perfection. Food should still look edible and inviting. Don’t over-style to the point where items look fake. A bit of natural mess keeps it real. Crumb edges, uneven cuts, casual look.
When Deconstruction Works Best
This style shines for dishes with many clear parts. Build-your-own items like bowls, wraps, and pizzas are naturals. Complex dishes with hidden items gain from the reveal. Viewers see exactly what they’re getting. Teaching content, ingredient features, and brand trust campaigns all use deconstructed shots well.
Not every dish needs deconstruction. Sometimes beauty lies in the whole picture. A perfectly made plate where parts blend together. Use judgment. Deconstruct when it adds value: showing quality, explaining flavors, or revealing craft. Otherwise, let the finished dish speak for itself.
For more on pro food styling basics, explore our guide to food styling secrets. Deconstruction is just one tool in your styling kit. These food styling ideas work best when used to help rather than distract from your food’s appeal.
3. Shift Your Perspective: Unusual Angles and Artistic Compositions
Most food photos follow the same patterns. Overhead flat lays or standard 45-degree front views. While these work, they’re everywhere. Unique food photos need to break free from norms. Try angles that surprise viewers. Your angle choice changes the story your photo tells. It turns a casual snap into an artistic statement.
Why Angle Matters More Than You Think
Camera angle sets the mood and focus. An overhead view treats all items as equal. Nothing stands out more than anything else. A low angle raises the food’s status. It makes dishes look grand and bold. Side profiles show shape and form. The angle you pick is not just tech. It is story. It tells viewers what matters and how they should feel about the food.
Exploring the Angle Spectrum
The Flat Lay Overhead: The Instagram classic. Everything sits parallel to the lens. Full plates, utensils, items, props all laid out flat. Works great for showing context, story, and plenty. The key: vary heights with stands and risers so it’s not really flat. Add depth through layers. This angle shines at showing full table settings and ingredient spreads.
The 45-Degree Standard: The natural dining perspective. This is how we actually see food when sitting down to eat. It feels familiar and comfortable but can seem generic. The solution: get closer than normal. Extreme close-ups at 45 degrees create intimacy while maintaining the familiar angle. Pull viewers into the plate.
The Low-Angle Hero: Place your camera nearly at table level. Look up at the food. Suddenly that burger becomes a towering star. That stack of pancakes rises like a work of art. This angle fills food with status and scale. It is dramatic, bold, and powerful for creative food photography that aims to impress.
The Extreme Side Profile: Turn the camera 90 degrees so food appears edge-on. This bold look shows shape and outline. A side-view pizza slice becomes a triangle of crust, sauce, cheese, and toppings. A cocktail glass turns into a layered column of colors. This is modern, minimal, and eye-catching because it is rare.
The Top-Down Slight Tilt: Pure overhead feels clinical sometimes. A slight 10-15 degree angle introduces perspective and depth. Most elements remain visible. You gain foreground-background relationships. Closer elements appear larger and more important. The composition feels more dynamic and less rigid.
Angle Selection by Food Type
Recommended Angles for Common Dishes
Different foods shine from different views. This table matches dishes to their best angles.
| Food Category | Best Angle | Why It Works |
|---|---|---|
| Bowls (Soup, Ramen, Curry) | 45-degree or overhead | Shows depth and ingredient layering |
| Burgers & Sandwiches | Low angle or side profile | Emphasizes height and stacking |
| Flat Foods (Pizza, Steak) | Overhead or slight tilt | Shows complete surface and toppings |
| Drinks & Cocktails | Side profile or low angle | Captures layering and glass form |
| Plated Fine Dining | 45-degree | Natural dining perspective, intimate |
| Ingredient Spreads | Pure overhead | Equal emphasis on all elements |
Composition Beyond Angles
Angle is just one dimension of creative composition. Consider these additional elements:
Negative Space: Don’t fill every corner. Empty space creates room and focus. It feels smooth and sure. Empty space also gives room for text overlays in ads and promos.
The Golden Ratio: Instead of centering everything, place your main subject about one-third from the frame edge. This makes more lively, pleasing shots than dead-center placing.
Depth Layers: Include near, middle, and far elements. A blurred item up close. The sharp main dish in the middle. A hint of kitchen or dining space in the back. This layered look pulls viewers in.
Framing Elements: Use props to create natural frames around your food. Arching utensils, tilting items, or partial blocks add depth. They guide the eye. The viewer looks through or around things to reach the main dish. This is more engaging than a clear open view.
Technical Considerations
Different angles need different setups. Overhead shots need tripods with overhead arms. Place them right above the food. Low angles need stable support. Tripods are key at these angles where shake shows most. Side profiles need careful background picks since more wall enters the frame.
Lighting shifts with angle too. Overhead lighting works best for flat lays. Side lighting creates dimension for angled shots. Back lighting produces drama for low angles where silhouettes and translucency shine.
Breaking the Rules Intentionally
Once you know the basic angles, the real fun begins. Mix angles in the same shoot. Start overhead, then try 45 degrees, then go low-level. The variety keeps content fresh. It gives you options for different apps and uses.
Consider unusual framings too. Extreme crops that show only part of the food create intrigue. Reflections in spoons or glossy surfaces add visual complexity. Shadows cast by food can become compositional elements themselves.
The best creative food photography embraces trying new things. Test the angle that feels wrong at first. The surprise view might be exactly what makes your shot stand out. For more tips on pushing creative limits, explore our guide on food styling for different cuisines. Your unique view is your edge. Use it boldly.

4. Setting the Scene: Storytelling Through Food Photos
Great food photos don’t just show what a dish looks like. They tell a story about where it comes from and how it’s made. Food photo ideas become memorable when they spark feelings beyond simple hunger. The right props, backdrops, and scene cues turn pictures into stories. These stories connect with viewers.
Why Stories Matter
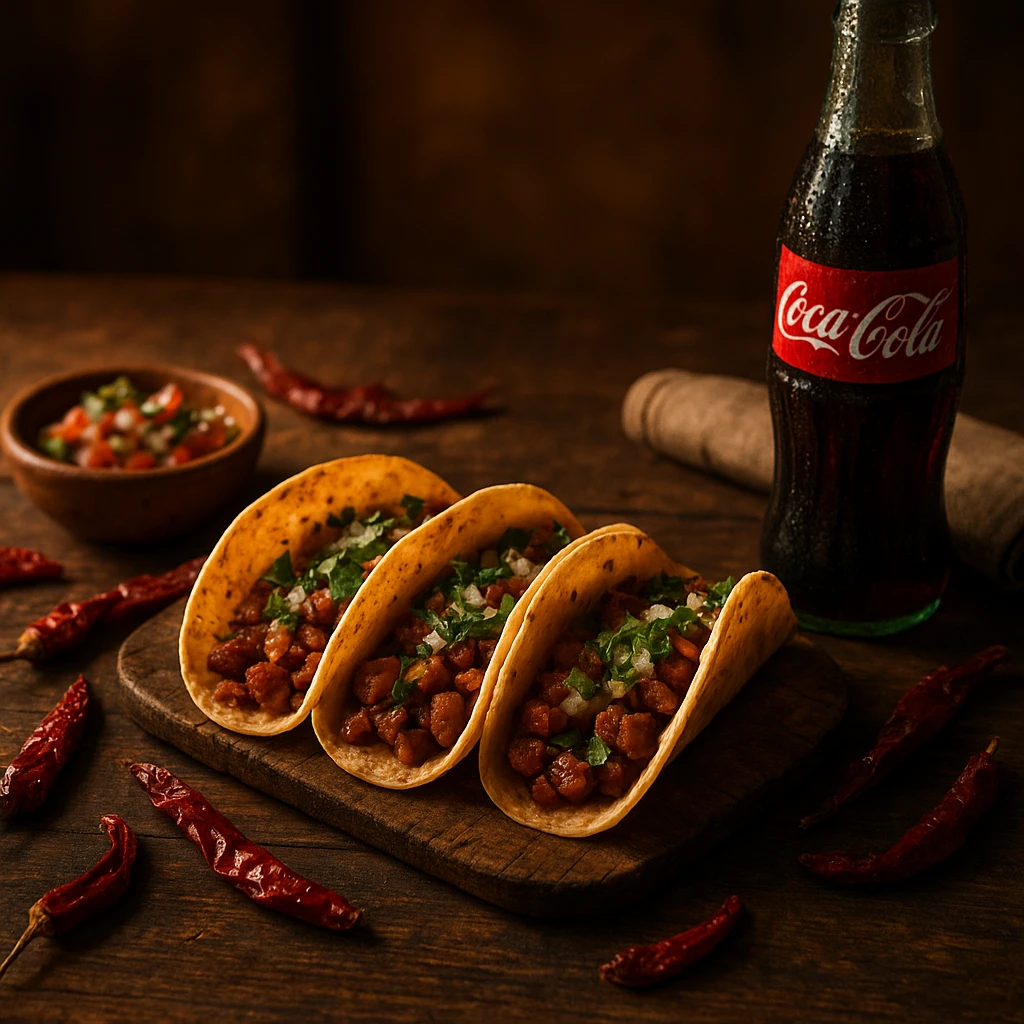
Humans are hardwired for narrative. A photo of a taco is informative. A photo of a taco sitting on a worn Mexican market table beside dried chilies and a cloth napkin? That’s evocative. It suggests authenticity, tradition, craftsmanship. It transports viewers to a specific place and cultural context. Stories make food meaningful, not just delicious.
Storytelling Through Environmental Context
Location, Location, Location: Where is this food being enjoyed? A rustic wood table suggests farmhouse or country life. Marble surfaces hint at urban cafe or fine dining. A beach towel backdrop puts the food in vacation mode. Pick backdrops that support your story. The setting should help, not compete.
Cultural Cues: Small touches show cultural roots right away. Japanese food might have chopstick rests, wasabi, or a teapot. Italian dishes could show parmesan, olive oil, or linen napkins. Mexican cuisine pairs well with terracotta, lime wedges, or woven cloth. These real cultural markers help viewers know and value the food’s roots.
Seasonal Signs: Props can show time of year. Fall foods might have fallen leaves, warm-toned surfaces, or cozy textures. Summer dishes could show bright linens, fresh herbs, or picnic items. Winter pairs with rich fabrics and steam. Spring brings fresh flowers, soft tones, and light airy surfaces. These season cues create mental links and feelings.
Character and Mood Development
Every photo has a mood. Is your dish casual comfort food or elegant fine dining? Is it rustic homemade or polished and pro? Props set the vibe:
Casual/Rustic: Wood surfaces, linen napkins, simple forks, handmade ceramics, loose crumbs or herb bits. The mood is friendly, real, down-to-earth.
Elegant/Refined: Marble or dark surfaces, shiny silverware, crystal glass, few placed props, no mess. The mood is classy, premium, planned.
Modern/Minimal: Smooth surfaces, one main prop, bold empty space, clean lines. The mood is current, sure, design-led.
Cozy/Comfort: Soft textiles, warm lighting, layered backgrounds, casual arrangement. The mood is nurturing, welcoming, homey.
Prop Selection Checklist by Mood
Your props set the emotional tone. Use this guide to match materials and lighting to your desired mood.
| Desired Mood | Surface Materials | Key Props | Lighting Feel |
|---|---|---|---|
| Rustic | Reclaimed wood, slate | Linen, herbs, ceramics | Warm, natural |
| Elegant | Marble, dark surfaces | Silver, crystal, minimal | Dramatic, controlled |
| Modern | Seamless, solid colors | Single statement prop | Bright, even |
| Cozy | Textured fabrics, wood | Textiles, soft shapes | Soft, warm tones |
| Cultural | Region-specific materials | Cultural artifacts | Authentic to region |
The Human Element (Without Humans)
Hands tell great stories without showing faces. A hand holding a fork hints at that first bite. Hands making food show care and skill. Adding salt, tearing bread, pouring sauce. The human touch sparks mirror neurons in viewers. It helps them picture eating the food themselves.
You don’t need pro hand models. Your own hands work fine. Keep nails clean and plain. Remove rings that distract. Place hands in a natural but planned way. Use slight tension in the fingers and careful utensil spots. The action should feel real even though it’s set up.
Process as Story
Sometimes the story isn’t the final dish but the journey to get there. Prep photos show effort and skill. Chopping, mixing, marinating. The change from raw to cooked builds excitement. Process shots grow respect for the craft behind food. This behind-the-scenes content works well for fans who care about how food is made.
Think about where items come from too. A photo of veggies still with garden dirt shows farm-fresh appeal. Fish shown with fishing gear or ice hints at just-caught quality. These origin stories boost real feel and quality views.
Building Your Prop Collection
You don’t need pricey props. Start with basics: a few surfaces in different colors and textures. Wood, marble, fabric. Add simple utensils that shoot well. Gather napkins and linens in various colors and textures. Find small bowls for sauces and garnishes.
Thrift stores are gold mines for cheap props. Old silverware, cool plates, unique cloth. All add feel without big cost. Build slowly. Get pieces that go together and fit your brand look.
Avoiding Prop Clutter
The biggest story error? Overdoing it. Too many props make visual chaos and pull eyes from the food. Every prop should earn its spot by adding to the story. If an item doesn’t help the tale, remove it. Better to have three good props than ten random ones.
Empty space is your friend. Let the food breathe. Give viewers rest spots. Some of the best food photos use few props. A single good utensil. A well-placed napkin. Nothing more. Trust in simple reads as classy.
Authenticity vs. Artifice
Props should boost, not fake. The story should feel real, not built. A rustic Mexican taco on an actual old table tells a real story. The same taco on a brand-new fake-worn table from a craft store feels false. People spot and reject fakes more and more. Real materials, real flaws, real settings. These build trust and bonds.
For more on food styling basics that support stories, explore our guide on food photography backdrops. Your props and settings are backup actors in your food’s story. Pick them with care. Arrange them on purpose. Let them serve the tale rather than steal it.
5. The Tech Edge: Using AI for Creative Food Photos
The world of food photos is changing fast. What once needed pricey gear, pro studios, and hours of editing is now open through AI tools. Artistic food shots are being redone as tech lowers entry walls. It opens new ways to test and repeat. Knowing how AI works with old methods gives smart food firms an edge.
What AI Actually Does for Food Photography
Let’s talk about what AI can do in clear terms. AI food photo tools offer these main features:
Image From Text: Describe a dish and make styled photos from scratch. This works great for showing concepts and testing ideas before cooking. Explore dozens of visual paths without making a single dish.
Photo Upgrade: Upload your food photos and add AI styling. The AI reads the image and spots food items. It makes pro versions with better layout, light, and look. This fills the gap between phone shots and pro photos.
Style Match: Apply the same visual look across many images. This is key for brands keeping a unified style. It works across menus, social media, and delivery apps. Instead of telling each shooter your brand look, AI applies it every time.
Background Swap: Change backdrops without reshooting. The same dish can show up on rustic wood, marble, or smooth surfaces. Make app-specific versions without extra photo work.
Fast Versions: Make many versions fast. Test different plating, light setups, or color picks in minutes not days. This test power was once beyond reach without big photo budgets.
The AI Workflow Advantage
Old food photo workflow takes longer. Plan menu. Book shooter (2-week wait). Hire stylist. Shoot. Wait for edits. Review. Ask for reshoots (if budget allows). Get final images 3-4 weeks later.
AI workflow is much faster. Plan menu, then make concepts right away. Pick winners and create final images. The whole process can happen in an afternoon, not a month.
This speed matters. Seasonal menus can launch while the season is still fresh. Limited offers get promo images right away. No more missing promo windows. A/B testing works when you can make many versions without high costs.
AI vs Traditional Photography: Decision Matrix
Each scenario calls for a different approach. Use this table to decide when to use AI versus a pro photographer.
| Scenario | Best Approach | Why |
|---|---|---|
| Daily social content | AI generation | Speed and volume, iteration friendly |
| Menu updates | AI or hybrid | Quick turnaround, consistent branding |
| Seasonal campaigns | AI generation | Time-sensitive, multiple variations needed |
| Brand hero shots | Professional photographer | Maximum quality, emotional impact |
| Cookbook/magazine | Professional photographer | Editorial standards, print reproduction |
| Delivery app testing | AI generation | Rapid A/B testing of multiple styles |
Branded Environments: Consistency at Scale
One of AI’s best uses is branded setups. These are saved style picks that make sure every image fits your brand look. A restaurant sets their visual DNA once: light mood, color palette, prop style, backdrop types. Then every new image auto-applies these settings.
This match was once costly and hard to keep. Different shooters read “rustic” in their own way. Edit time tried to match past work. With AI brand setups, the match is instant and auto. Your feed, site menu, and delivery app all share the same visual style.
AI for Concept Development and Testing
Before going all-in on full shoots, AI helps test creative paths. Planning a rebrand? Make food photos in many styles. Clean modern, warm rustic, bold color. See what clicks with your team and test crowd. Launching a new dish? Make concept art to guide plating and showing choices.
This idea phase stops costly errors. You find the best visual paths before paying for pro shots. The AI becomes a creative helper, not a swap for human shooters.
Integration with Existing Workflows
AI doesn’t mean dropping old ways entirely. Smart teams use both on purpose:
Mix Method: Use AI for bulk content. Daily posts, menu items, delivery apps. Hire shooters for star hero shots, brand campaigns, and premium stuff. AI handles the repeat work. Pros handle the high-end work.
AI-Helped Prep: Make AI concepts before pro shoots. Show shooters sample images of your vision. The shoot runs faster. Everyone sees visual guides upfront, so hopes match up.
Post-Edit Boost: Use AI tools for edit tasks. Background removal, color fixes, touch-ups. This speeds work and cuts costs even with normal photos.
Quality Considerations and Limitations
AI food photos have grown a lot but aren’t magic. Knowing limits avoids let-downs:
Best For: Social media content, menu photos, delivery app images, concept views, fast rounds, brand match across bulk content.
Less Good For: High-end spreads, big print ads, award entries, cases needing total realism where any AI marks would fail.
Quality varies by tool and settings. Higher quality takes longer and costs more. But it gives better output. Many good teams make many versions at normal quality first. Then they boost the best ones to high-res final forms.
Getting Started with AI Food Photography
Start with clear goals. What problems are you fixing? Speed? Cost? Match? Finding your main goal helps pick the right tools and methods.
Start small. Make a few images to test quality and fit with your brand. Compare AI versions to your current photos. Check if the look matches what you want. Tweak prompts and settings before big projects.
Track results. Check stats that compare AI content to old photos. Watch sales on delivery apps. A/B test different AI styles. The creative food photography results speak for themselves when you have data to back your visual picks.
The Future is Hybrid
The best food photo plans mix AI speed with human art. AI handles volume, versions, and style match. Shooters and stylists focus on hero shots, emotion, and premium work. It’s not AI vs photos. It’s AI plus photos. Each tech is used where it’s best.
For restaurants and food firms, this mix approach boosts both quality and speed. You get pro results where they matter most. You keep active content flows that would cost too much with old methods alone. The tech is not swapping creativity. It is growing it by removing blocks from the process.
To see how modern AI tools are changing restaurant photos, explore our guide on AI food photography for small restaurants. Options are growing fast. Early users gain big wins in visual content quality and output speed.

Next steps
Ready to change your food photos? Whether you need fast rounds for social media, matched branded images for menus, or concept views before pro shoots, modern AI tools make it happen. Start by finding which ideas from this guide fit your brand and goals. Then test. Try action shots for energy. Use taken-apart plating for clear views. Try odd angles for drama. Add story props for feels.
The best food visuals mix tech skill with creative vision. Use these 15 creative food photography ideas as start points. Adapt them to your unique dishes, crowd, and apps. Your one-of-a-kind view is your edge in a packed visual world.
FAQ
What equipment do I need for creative food photography?
You can start with just a phone. Modern phone cameras make great shots. Add a small tripod for steady, even shots. Natural light from windows works well for starters. As you grow, think about a DSLR or mirrorless camera with a macro lens for close-ups. Add a bounce board for light and basic foam core. Many great food photos use small setups. Focus on learning layout, light, and styling before buying lots of gear.
How do I make food look appetizing in photos?
Freshness is a must. Food looks best right after making it. Colors pop and textures stay. Use natural side light to add depth and show texture. Style with care but don’t fake it. Wipe messy edges, add fresh garnish, place parts on purpose. Don’t over-style or food looks fake. Focus on hunger appeal: shiny surfaces, bright colors, steam from hot dishes. Practice plating before shooting. The better food looks in person, the better it shoots.
What’s the best lighting for food photography?
Natural window light works best for most food photos. Place food near a window with soft daylight and avoid harsh direct sun which creates unappealing shadows. Side light shows texture and adds depth, while cloudy days provide soft, even light. If using artificial light, softboxes create similar diffuse effects. Backlighting works well for translucent foods like drinks. Test different angles to see what makes your dishes shine.
How can AI tools help with food photography?
AI tools help with fast versions, matched styling, and concept testing. Make many style options fast for A/B tests on delivery apps or social media. Build brand setups that use the same look across all images. See menu concepts before cooking. Boost phone photos to pro quality. Use AI for bulk content. Save pro photo budget for star hero shots.
The mix approach grows both speed and quality. This hybrid method gives you the best of both worlds.
What are common food photography mistakes to avoid?
The biggest error: shooting food past its peak. Cold stuck food, wilted greens, and melting ice cream never look tasty. Shoot right after making it. Other common errors: using on-camera flash which makes flat bad light, over-styling until food looks fake, filling shots with too many props, and using just one angle. Don’t lean on filters to fix bad shots. Get it right first with good light and styling. Learn basics before leaning on editing.
How do I choose the right background for food photos?
Background choice rests on your story and brand. Wood surfaces hint at rustic casual dining. Marble shows class and polish. Smooth backgrounds make modern clean looks. Fabrics add texture and warmth. Key rule: the backdrop should fit without fighting. Skip busy patterns that pull eyes away. Build a small set of 3-5 flex surfaces in soft tones with mixed textures.
What’s the best camera angle for food photography?
No one angle is best. It rests on the food and story. Overhead flat lays work great for bowls, spreads, and showing many parts. The 45-degree angle copies natural dining view. Low angles add drama for tall items like burgers. Side views show shape and make modern looks. Try many angles for each dish rather than using the same view. The angle that feels a bit odd often makes the most lasting shots.
Related posts

Beyond Burgers: AI Food Styling for Diets and Cuisines
Use AI food styling to create accurate vegan, gluten-free, halal, kosher, and global cuisine photos that convert across delivery apps, QR menus, and social.

Close the Loop: Tie Food Imagery to Analytics and Sales
Stop guessing which food photos work. Learn a simple workflow to tie Yummify images to analytics, A/B test visuals, and promote only the photos that actually sell.

The Death of the $2,000 Food Photoshoot
Why big food photoshoots are dying and how AI workflows let restaurants keep menu photos fresh across delivery apps, QR menus, and campaigns-without $2K days.