Food Photography for Restaurants: The Complete 2025 Guide

Quick navigation:
1. Choosing Your Equipment: Pro Camera vs. Smartphone
When starting with restaurant food photography, picking between a pro camera and a smartphone is your first step. Both have clear pros and cons. Your choice depends on budget, skill level, and the image quality you need. Pro cameras have better sensors and swap-out lenses. DSLRs and mirrorless systems let you control depth of field. You can blur backgrounds to make the dish pop. According to B&H Photo Video, a tripod is key for sharp images. This is true when using natural light.
Pro setups cost a lot though. A full kit with lenses and lighting can top $2,000. For many small spots, this spend is hard to justify. Modern smartphones have great cameras that take stunning shots. The biggest plus? You already own one, and it fits in your pocket. You lack manual control over aperture and shutter speed. But phone cameras make up for this with smart software.
Cost and ROI Comparison
| Feature | Pro Camera Setup | High-End Smartphone |
|---|---|---|
| Initial Cost | $2,000 - $5,000+ | $800 - $1,200 (often owned already) |
| Learning Curve | Steep (weeks/months) | Low (hours/days) |
| Maintenance | Lenses, sensor cleaning, updates | Minimal |
| Portability | Low (heavy bag required) | High (pocket-sized) |
| Best For | Hero shots, print menus, large ads | Social media, daily updates, delivery apps |
If you are just starting or need to update images weekly, a smartphone works great. Use pro cameras for quarterly brand campaigns or high-end menus. See our cost calculator guide for a cost breakdown.

2. Mastering Food Photo Lighting
Lighting is the most important factor in food photos for restaurants. Poor lighting makes a yummy dish look dull or even gross. Natural light is the gold standard. It shows colors the right way and creates soft, nice shadows. The best source is a window with indirect, diffused light. Direct sunlight creates harsh shadows that hide details in your food. According to DoorDash, diffused window light works best for DIY shoots. It often leads to the highest click rates on delivery apps.
Natural Light Setup Guide
- Find the window: Look for a window near your prep area that gets bright, indirect light.
- Position the table: Put your table at a right angle to the window. Do not face the dish into the light or put the light behind it unless you want a silhouette effect.
- Diffuse if needed: If the light is too harsh, hang a white sheer curtain. You can also tape tracing paper over the window to soften it.
- Use a reflector: Bounce light back into the shadow side of the dish. Use a white foam core board or even a menu. This fills in harsh shadows and shows texture.
Sometimes natural light is not an option. Your kitchen might be in a basement, or you shoot at night. In these cases, you need fake lighting. You do not need pricey studio strobes. A simple LED panel with adjustable color works well. Set the color to ‘daylight’ (around 5600K) to keep colors true. Avoid overhead fluorescent kitchen lights. They cast a green tint that makes food look gross. Side lighting works great. It skims across the dish and shows textures like crispy crusts, melting cheese, or fresh herbs. For more details, check our guide on delivery app image guidelines.
3. Composition Rules for Stunning Food Images
Great lighting falls flat without strong composition. Good restaurant food photography guides the eye and tells a story about the dish. The most basic rule is the Rule of Thirds. Imagine a tic-tac-toe grid over your image. Most smartphone cameras offer this as an overlay setting. Place the main subject where lines meet. Avoid putting it dead center. This creates tension and interest. It makes the photo more dynamic.
Creating depth is key in 2D food images. Your audience cannot smell or taste the food. The image must show texture and depth. Shoot at a 45-degree angle (the ‘diner’s view’) or overhead (flat lay). Overhead shots work well for platters, bowls, or pizzas. They show how the dish is arranged. A 45-degree angle shows height in burgers, pancakes, or layered parfaits. According to B&H Photo Video, a shallow depth of field helps the main dish stand out. It blurs distractions and forces focus on the food.
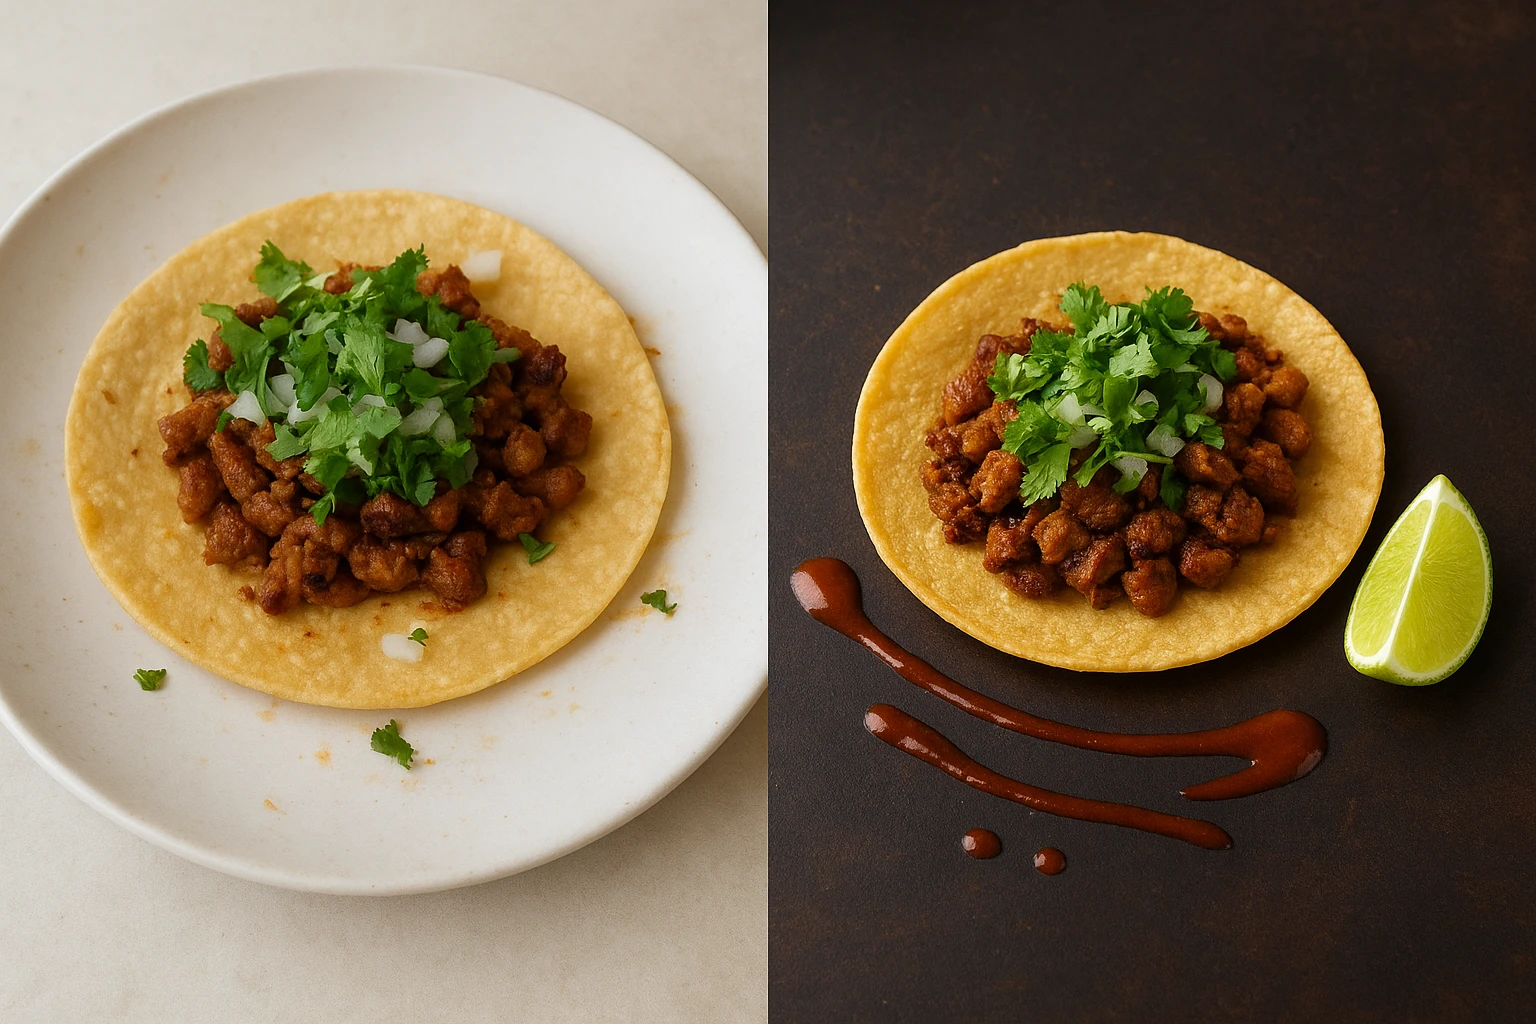
Negative space is another strong tool. Empty areas around the food prevent clutter. They also give room for text overlay on menus or social media. Do not be afraid to zoom in. Tight crops on details can be very striking. Think of the pull of a pizza slice or steam rising from a hot dish. Learn how to A/B test different compositions to find which angles drive the most clicks.
4. Food Styling Tricks and Tips
Food styling is key to restaurant food photography. It is the art of making food look as tasty as it tastes. These tips go beyond plating. They involve picking ‘hero’ items and setting them up for the camera. According to Food & Wine, creating a ‘hero’ version is standard practice. Pick the best-looking items and arrange them with care. This might mean setting aside the best bun or the brightest mint leaf.
Color and contrast are key. You want the food to stand out from the background. If you shoot a green salad, skip the green tablecloth. A white or wooden backdrop works better. Use props to tell a story. A linen napkin, wine glass, or scattered silverware adds context. But props should help the food, not distract from it.
Quick Styling Checklist
- Wipe the rim: Clean any smudges or spills on the plate rim right away before shooting.
- Add texture: A spritz of olive oil or water adds a fresh glisten to meats and veggies.
- Build height: Stack items to create height instead of spreading them flat.
- Garnish wisely: Use fresh herbs or a sprinkle of spice for a pop of color. But do not overdo it.
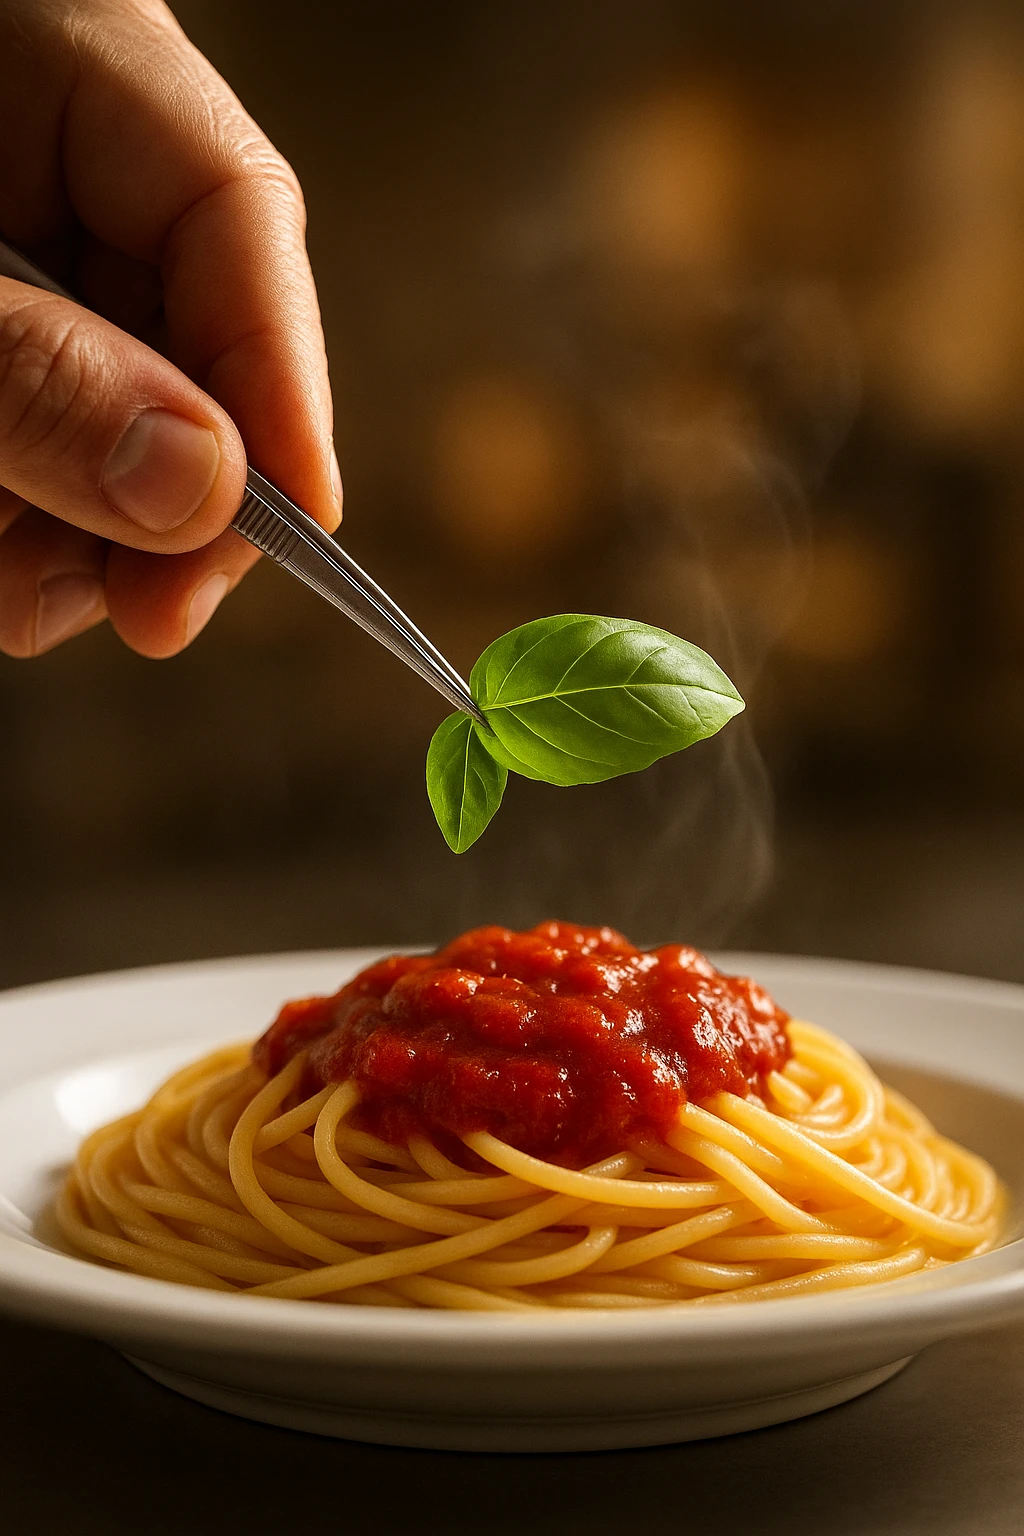
Freshness is a must. Food dries out fast under hot lights. Work quick, and have a ‘stand-in’ dish ready while you set up. Swap in the fresh, hot dish for the final shot. Tweezers are a stylist’s best friend. Use them to move sesame seeds or microgreens without messing up the plate. For more tips, read our guide on food photo mistakes to avoid.
5. Using AI Tools for Better Food Photos
AI is changing restaurant food photography. For those with tight budgets or high-volume content needs, AI tools offer a strong option. Yummify lets you transform simple reference photos. You can even use text descriptions to create pro-styled images. This is useful for ghost kitchens or virtual brands. These spots often lack a physical space for shoots. See our complete guide on AI food photos for small restaurants. You can create branded setups with specific lighting and backgrounds. Apply them across all menu items using brand kits for AI imagery.
The cost savings are big. A standard photoshoot can cost thousands and take weeks. AI makes dozens of versions in minutes for a fraction of the cost. This speed allows for A/B testing. Make three burger photo styles and see which gets more clicks. According to the Adobe Blog, AI can make endless custom backgrounds. It also handles color fixes and object removal. This speeds up the creative process.
AI tools also shine at boosting existing photos. You can remove messy backgrounds and swap them for clean surfaces. Add a seasonal theme like snowflakes for a winter menu. AI may not replace high-end editorial shoots for cookbooks. But it brings pro-quality images to everyday marketing. When using AI for menu images, learn about ethical AI food styling. Make sure your photos show what customers will really get.
Next Steps
Ready to upgrade your restaurant food photography without the hassle? Try Yummify today. Make pro, AI-styled food images in minutes. Update delivery app listings or refresh your social media feed. Our tools help you create visuals that drive orders.
Start with your top-selling dish to see results right away. Upload a reference photo and watch the magic happen. Track your clicks within the first week. Test your AI photos on just one delivery app first. Compare click rates to your current images within seven days. Most spots see big gains fast.
For example, build a simple shot list before you start your restaurant food photography. Group similar dishes to save time on lighting and styling setup. This workflow helps you produce consistent, professional images across your entire menu.
Related Articles
- AI Food Photos for Small Restaurants - Complete workflow guide for small spots
- Cost Calculator: AI vs Standard Photoshoot - Compare costs and ROI
- 5 Ways AI Food Photos Boost Delivery App Sales - Drive more orders with better visuals
- Brand Kits for AI Food Imagery - Create visual standards that stick
- A/B Testing Food Photos - Find the visuals that convert
- Delivery App Image Guidelines - Pass every platform check
- Food Photo Mistakes to Avoid - Common errors and AI fixes
- Ethical AI Food Styling - Draw the line between boost and fake
Explore how other spots succeed with restaurant food photography. Read real case studies from local cafes to national chains. Find tips you can use today. Bookmark these guides for quick reference. Share them with your team to align on visual standards. Apply these tips to your next menu update.
Also, schedule a weekly review of your restaurant food photography performance. Check which images drive the most clicks and orders. Replace your lowest-performing photos first to maximize your ROI with minimal effort.
Continue exploring:
FAQ
Do I need a pro camera for food photos?
No, you do not need a pro camera. Modern smartphones take great images for social media, menus, and delivery apps. Pro cameras offer more control over depth of field and low-light shots. But a smartphone with good lighting and composition works for most restaurant marketing needs.
What is the best time of day for natural food photo lighting?
The best time for natural light is mid-morning or mid-afternoon. The sun is high but not directly overhead. You want bright, indirect light from a window. Direct sunlight creates harsh shadows. North-facing windows often give the most even, soft light all day.
How can I take tasty food photos on a tight budget?
Use natural window light and a simple reflector like a white poster board. Focus on plating and wiping the plate clean. Use your phone grid lines for composition. Edit photos with free apps to fix brightness and contrast. AI tools like Yummify can also boost simple photos to look pro without the cost of a full shoot.
Can AI food images replace pro photography?
AI images are a strong add-on to standard photography. They may not fully replace it for high-end uses. They are perfect for menus, delivery apps, and social media where speed matters. For high-end editorial spreads or cookbooks that need specific setups, a pro photographer is still the best choice.
What are the most common food photo mistakes to avoid?
Common mistakes include using harsh sunlight or dim fluorescent lights. These distort colors. Another error is shooting from too far away. This makes the food look small. Avoid cluttering the frame with too many props. Clean the plate rims before shooting. Finally, skipping edits can leave a good shot looking flat.
How do I style different cuisines for photos?
Different cuisines need different approaches. For Italian food, focus on rustic textures and warm lighting. For Asian cuisine, show the bright veggies and glossy sauces using side lighting. Shoot burgers at a 45-degree angle to show height and layers. Flat lays work best for sushi, tapas, or breakfast spreads.
Related posts

15 Creative Food Photography Ideas to Make Your Dishes Stand Out
Discover creative food photography ideas to make your dishes stand out. Learn action shots, deconstructed dishes, unique angles, storytelling, and AI tools for stunning food visuals.

Beyond Burgers: AI Food Styling for Diets and Cuisines
Use AI food styling to create accurate vegan, gluten-free, halal, kosher, and global cuisine photos that convert across delivery apps, QR menus, and social.

Close the Loop: Tie Food Imagery to Analytics and Sales
Stop guessing which food photos work. Learn a simple workflow to tie Yummify images to analytics, A/B test visuals, and promote only the photos that actually sell.